Another day, another Lightroom slider to learn. 😀 Today, we’re talking clarity. I haven’t always been a big fan of the clarity slider. Before Lightroom 4, the clarity slider gunked up images and gave them a look that I just wasn’t fond of. However, I find that the Clarity slider in Lightroom 4 brings a really nice way to bring out the details of your photos.
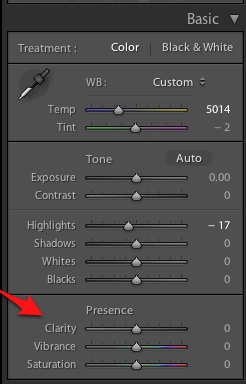
You’ll find clarity in the Develop module. On the right side of the Develop module, the first box you’ll see is Basic, and you’ll find the clarity slider in the Presence section. (If you don’t see all these settings, make sure and click the little arrow to open up all of the Basic sliders! :D)
You’ll find the clarity slider in the Develop module’s Basic panel – it’s at the top on the right side. Clarity is in the “Presence” section.
I have a hard time describing what exactly clarity does. It’s going to bring a little edginess to your photos. A bit of drama. It’s going to sharpen the edges and bring focus to areas that have detail.
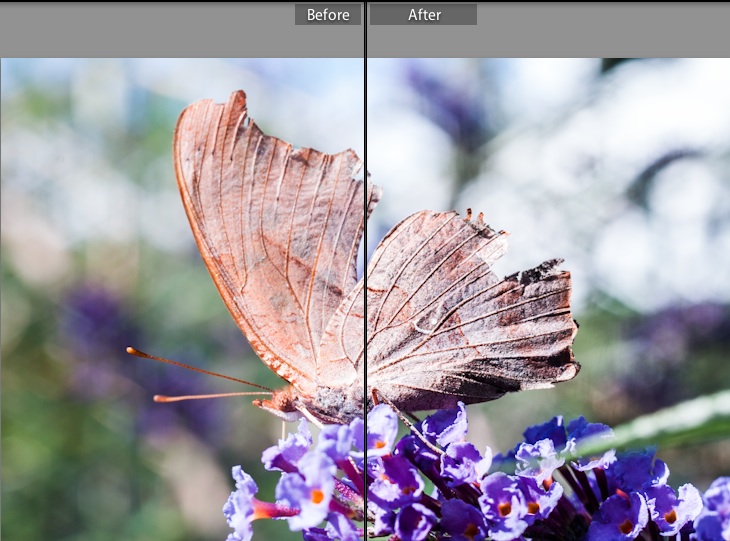
I love using the clarity slider when I have details that I want to highlight. The photo blow is a great example of that. The after photo shows what happens after I added around +70 in Clarity. Notice the details, lines, and ridges of the butterfly’s wings are greatly accentuated by the clarity slider. The slider also has an interesting effect on the out of focus background areas.
The clarity slider isn’t an adjustment that you’re going to apply to every image. I don’t think it’s usually a flattering look for people photos, especially any photos where faces are prominently featured. Keep in mind that the clarity slider would be inclined to accentuate wrinkles, skin imperfections, and generally not flatter your subject.
Let’s also not overlook the fact that we can use negative clarity amounts for a softening, almost dreamy type effect:
This image uses negative clarity amounts at the top for a softening effect, and a positive amount of clarity below to bring out finer details. Notice how the details in the bush differ between the two frames.
One of my favorite negative clarity tricks is to use the brush to soften a subject’s skin. We can use the adjustment brush with a negative clarity setting and brush over the subject’s skin to remove some of the detail (in this case, the skin flaws) to get better looking skin. We’ll talk more about the adjustment brush sometime soon. 😀
Wrapping Up
How do you feel about the clarity slider? Are you a big user or do you avoid it? Let me know what you think with a quick comment below.


