Vignettes are effects applied to the edge of our images, and Lightroom makes it a breeze to apply them. Get excited today about adding yet another visual effect to our toolbelt of knowledge. Let’s take a look at how to use vignettes in Lightroom!
Most lenses are going to vignette your images just a bit. It’s a shortcoming of lenses and it’s something that we can correct. But sometimes, we actually want to add a vignette ourselves. For this, we’ll use a post-crop vignette in the Develop module.
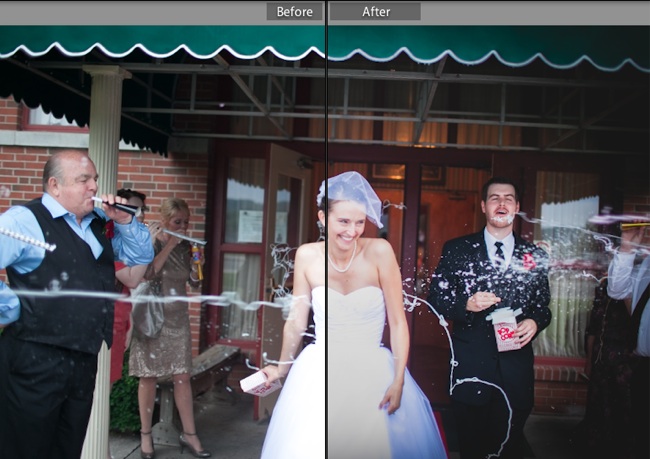
First, let’s take a little closer look at what exactly what the vignette control does. In this frame I’ve take one of my images and applied a moderate vignette to the image with default settings so that you can get an idea for how we can use the post-crop vignette.
Notice here that in the right side of the frame is significantly darker then the left edges. Thus, you notice the edges of the photo far less on the left.
(Lightroom also allows us to apply an “inverse vignette” by pushing the slider to the right. This gives it a white vigntte. If you would let me interject some opinion here, I think that the white vignette is an awful effect that should never be applied… except for 80’s style glamour portraits.)
I like to darken the edges of many of my portraits because it leads the viewer’s eye into the center of the frame. I’m a photojournalist style wedding photographer and prefer my 35mm lens, so I usually don’t shoot super tight compositions. I use effects like vignettes to lead the viewer’s eye through the frame. When you darken the edges,
I like to darken the edges of many of my portraits because it leads the viewer’s eye into the center of the frame.
To get started with vignettes, let’s first make sure that we are in the Develop module. Now, let’s scroll all the way down until you find the panel labeled “Effects”. Here is where you’ll find the post-crop vignetting tool.
A quick note: there are two types of vignette options that Lightroom offers us. The kind that we’ll be using is a “post-crop vignette”. I think of this as the type of vignette that gets applied for style. There are also vignette correction options that correct opitcal issues. Those only get applied to the original image shape, so cropping could create an uneven vignette. If you’re applying a vignette for style’s sake, stick with the post-crop vignette.
Typically, the default settings are exactly what I use. I don’t spend a lot of time tweaking this. I usually will just grab the “amount” slider, pull it to the left a bit until I like the look, and then call it done. (By the way, I always leave the vignette set to “highlight priority.” Works great for me. :D) For the sake of reference, let’s take a look at what all of the sliders mean:
- Amount – pretty basic, this is just how much vignette you want. I pull this slider to the left just a bit.
- Midpoint – this sets the center point of the vignette
- Roundness – the roundness determines the “shape” of the vignette. Dragging it left makes it more circular
- Feather – feathering the vignette determines if the vignette is
- Highlights – protection of highlight regions
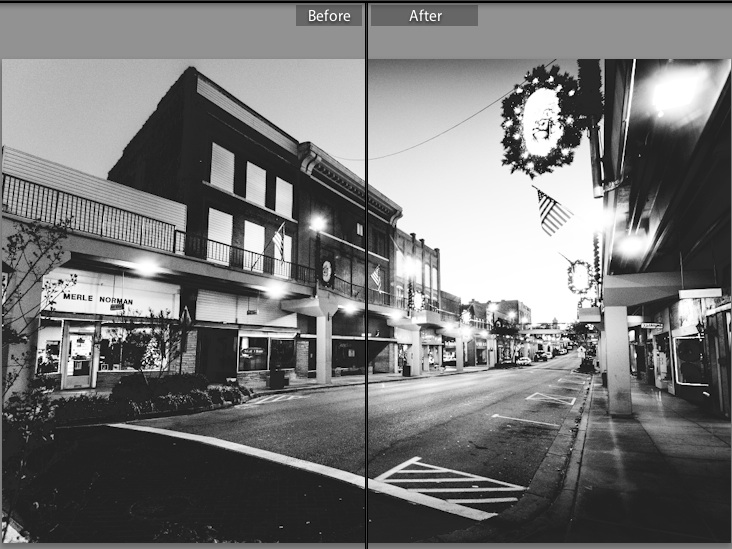
This image (at right) has a heavier vignette to give it a bit of a film noir type look.
Let me share one more important tip for working with vignettes. Lightroom’s color scheme is kind of dark. That means that the area that surrounds your photos is kind of dark, just like the vignette you’re applying. If you aren’t careful, you can overdo it on the vignette without even realizing it.
Are you a vignette user? Leave a comment to let me know your thoughts on using vignettes to enhance your photos.

