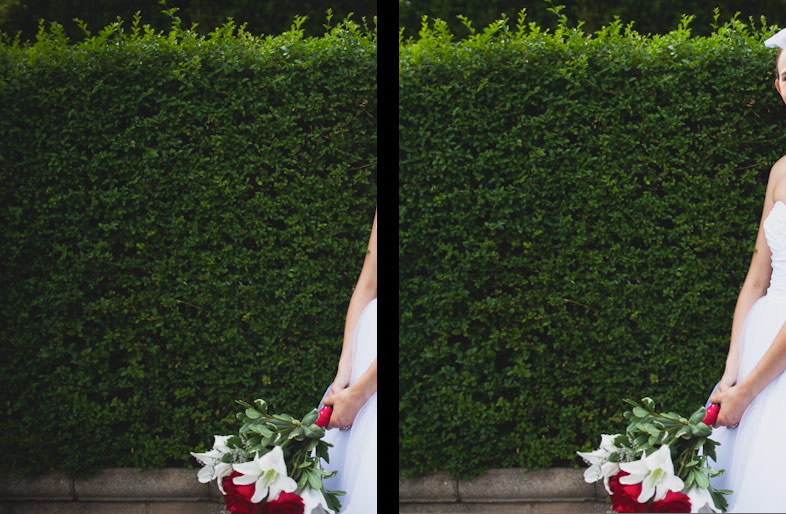
I’ve got some bad news – your precious camera lenses aren’t perfect. Even when you’ve done everything you can to setup the shot perfectly, your optics are going to fall short of delivering technical perfection. However, it’s Lightroom to the rescue! (Like always, right?)
Let’s take a look at the flaws that lenses face, and how we can easily correct them in Lightroom.
The Flaws
Lenses have a variety of optical flaws. Here’s the three big ones that come to mind:
- Distortion – this is the big thing that you’ll notice in terms of lens flaws. Distortion can take two forms: barrel and pincushion. Barrel distortion is when a photo looks “bloated” or stretched wide, while pincushion distortion is a “sucking in” type distortion. This Wiki article is a great read.
- Vignetting – vignetting appears in the form of darkened corners. Correction will remove this darkening of the corners so that the exposure is consistent. I add this for effect to some of my images
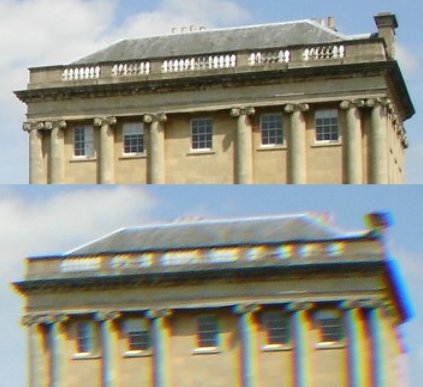
- Chromatic Aberration – That’s a mouthful right? Chromatic aberration is when the edges of photos will have a “glow” about them, often purple or blue in color
Profile Corrections
Profile corrections are Lightroom’s one click answer to handling many of these flaws! This is really a powerful feature and can take care of the shortcomings in just seconds.
One big thing here is that this relies on Lightroom having a profile built-in for your lens. Adobe builds a big database of lenses and their shortcomings and then builds “profiles” to correct them. The best part is that Lightroom knows which lens was used to shoot your photo and then
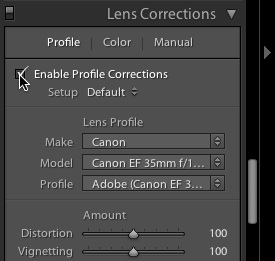
To correct the photo, we have to be working in the Develop module. On the right side of the Develop module, scroll all the way down until you find the Lens Corrections panel. Next up, just tick the box that says “Enable Profile Corrections”. Boom. In almost all cases, this will handle all of the work of correcting your distortion and vignetting. You’ll see your lens information pop up in the dropdown menus and the corrections will automatically apply. You can also slightly tweak those settings with the sliders.
Clicking the Enable Profile Corrections box caused Lightroom to automatically detect the lens and correct distortion and vignetting.
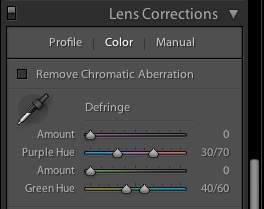
Clicking the Enable Profile Corrections box will automatically take care of Distortion and Vignetting. If you want to work with chromatic aberration and some of the color artifacts, click the header marked “Color” to let you correct those. Clicking “Remove Chromatic Aberration” and then tweaking the sliders to the colors of the artifacts in your image is a quick fix for the problem.
Clicking the Remove Chromatic Aberration box and tweaking the sliders will take care of the color artifacting pretty easily!
Usually, one click to enable corrections is all that it takes to identify your lens. The lens information is built into the image file in the EXIF data. Keep in mind though, that if you’re working with images in a funky way or saved the images and removed the EXIF data, you’ll have to manually select the lens from the dropdown menu.
There’s also a chance of Lightroom not having correction data for your lens. This means that they didn’t build a correction profile for your lens. This is where manual corrections can be useful.
Manual Corrections
So what happens if Lightroom doesn’t have a profile for your lens of choice? We have to try and apply some of these corrections on our own if we think that our image needs them. This is where personal experimentation and a really good eye for straight lines and distortion are needed. The ability to apply perfect manual corrections exceeds my skill level, but the controls are built in if you want to experiment.
Wrapping Up
Your lenses aren’t perfect, but Lightroom can fix a lot of those shortcomings. The lens correction panel is another amazing tool that wil fix our optical imperfections with a couple of clicks. If your lens lacks a profile, check out some of the manual controls.
This before and after is subtle, but shows the correction. Notice how vignetting is removed from the bushes on the left side – those areas are lighter after distortion is corrected!
What’s your experience with the lens correction panel? Have you tried it out? Check in with a comment if you need more help.

