Lightroom Love

  • Home
  • Presets
  • Get Help
  • Contact

What is a RAW file?

December 16, 2018 by Andrew Leave a Comment

Although these images are collectively known as “RAW” images, the file extension is very rarely .raw. Each camera manufacturer applies their own file extension (that’s the letters at the end of the file) and they can sometimes even differ from camera to camera.

For instance, Nikon’s RAW files carry the extension .NEF while Canon’s RAW files are .CR2 files. These are both examples of RAW image formats.

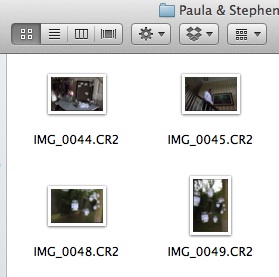
These .cr2 files are RAW files from my Canon 5D Mark II.

There are few discussions that divide photographers like the RAW vs JPEG argument. Photographers of different camps swear by both types, and the discussion of which is better is really beyond thes cope of this article. (I’ll probably cover this later)

For now, just focus on knowing that RAW images aren’t as good straight out of camera as JPEG, but can really shine with editing. RAW files are larger but contain more data as a result. RAW holds more potential, but has to be processed by software such as… Adobe Lightroom for using presets.

Filed Under: Photography Tagged With: finished

Vintage Film Effect in Lightroom 4 Using Curves

December 16, 2018 by Andrew Leave a Comment

One of the most popular editing effects right now is pushing digital images to look more like film photos. Digital has taken over the world, but film has a “look” that’s just hard to match. I would certainly advocate going out and shooting some rolls of film, but if that’s not a possibility, we can use Lightroom to apply a vintage film effect using the tone curve.

The tone curve scares some users away because it’s not like anything that they’ve ever seen before. It’s a graphical representation of the photo, and it’s not necessarily logical. Let’s take a look at how to use it.

  • First of all, go ahead and pick an image to work with and enter the Develop module.
  • Now, feel free to apply any other tweaks that you need to – exposure, clarity, temperature, etc.
  • Okay, scroll down the right panel in the Develop module and you’ll come to the Tone Curve. This has the secret sauce for what we want to do.

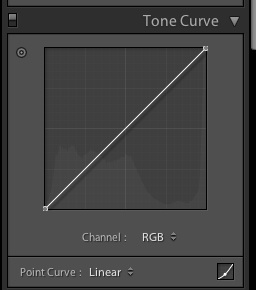
Here’s what my tone curve looks like to begin with:

By default, this is how the tone curve will appear.

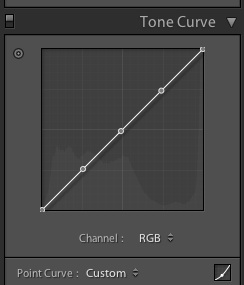
Looking pretty flat right now right? What we want to do is add some control points that we can shape this curve with. To add these points, all we have to do is click where we want the points. I added three points; this is how I positioned my points:

I added 3 points for this effect.

Okay, now we’re ready to have fun. Let’s talk a little theory here. Right now, we’re starting with a default tone curve. The point at the lower left hand corner represents the black areas of the photo. The point in the upper right hand corner represents the “whites” of the photo. As we move these points, we’re pushing the blacks to grey, and likewise for the whites. You’ll see what I mean here in a moment.

So here’s my starting image:

The starting image.

Now, to start playing with the image, I’m going to grab the lower left hand corner point, and start dragging it up. I pull it up until it flattens out.

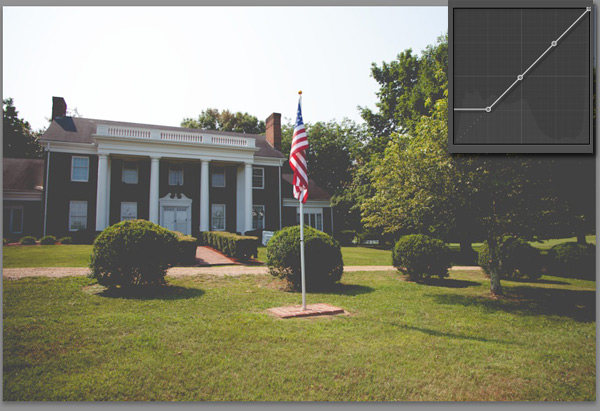
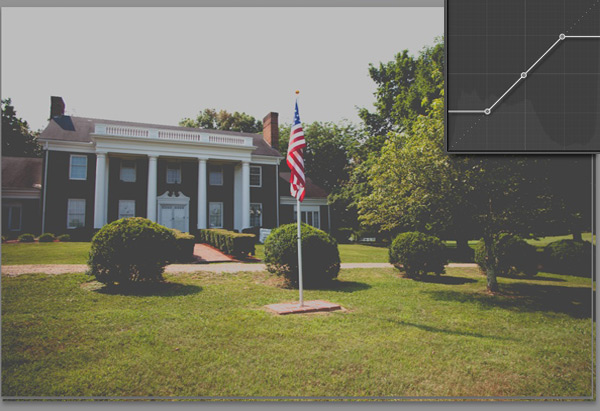
See what happened here? In the upper right corner, you can see how my curves look at this point. Compare this to the earlier image, and you can see that the black areas of the photo are pushed to greys. That’s what playing with the tone curve does!

Now, let’s play with the upper right hand corner. Here’s what we get:

Now, we’ve pushed the white area – represented by the upper right hand point, down to the greys as well by dragging it downward.

I really like the effect that this provides. It kind of “mutes” the photo and reduces the contrast, and reminds of the film photos that I grew up around.

Of course this can be done with a free lightroom preset as well.

Filed Under: Image Editing Tagged With: finished

How To Get the Student Discount for Lightroom 4

December 16, 2018 by Andrew Leave a Comment

Want to buy Lightroom 4 for half the price? If you’re a student (or in education), it’s not hard to do. Just present proof of your scholarly pursuits and you’ll get 50% off the retail price. And it’s exactly the same software!

1. Visit Adobe’s educational site here.

2. When the pop up appears, go ahead and check the box you are eligible and continue on.

3. Lightroom 4 was on the 2nd page for me, so if you don’t see it, make sure you check the other page of products. Click Buy.

4. Proceeding through the checkout, login or create an Adobe account.

5. Enter your information – depending on what you enter, Adobe may have to verify it, but regardless – you’re on your way to a half price edition of Lightroom!


Filed Under: Deals Tagged With: finished

The Perfect Computer for Lightroom

December 16, 2018 by Andrew Leave a Comment

We’ve all go the need for speed. My goal in my Lightroom Coaching is to always help photographers move their their digital workflow more quickly. I think we all want to move quicker in the editing phase, and that’s the goal of all of the teaching that I do.

But what if the slowest part of your workflow isn’t you? What if your computer is to blame? If you find it locking up, freezing for several seconds, or generally taking a long time to complete operations, you probably need to upgrade or clean out your computer. Today, we’re talking computers to help make Lightroom run at top speed.

Yeah, probably wouldn’t want to run Lightroom on this computer.

This is kind of a technical discussion, but I’m going to make it as easy as possible. These parts and components are far more complex than I’m going to make them, but the goal here is just to keep it simple. Whether you’re buying a new computer or looking to upgrade your current one, keep in mind some of the things that I’m discussing here.

The Basics

There are really three basic computer components that drive the speed at which our computer moves.

Processor

Out of the three factors, this is probably the toughest to change or install. I recommend buying this right the first time. We  want the absolute fastest processor that you can find. These days, that means looking for an Intel processor that is an i7 processor. AMD also makes processors, but my computers are usually Intel machines, especially given that I am switching exclusively to Mac.

Processor speeds are expressed in gHZ, or gigahertz. The i7 processor I mentioned above is actually a quad core processor. Typically, more processors are better and lead to faster performance. (Again, this is a very simplified technical discussion)

RAM

First, Lightroom loves RAM. The more you have, the better it runs. If you aren’t familiar, RAM is a part inside of your computer that helps (more). Think of RAM as the temporary space that

My Macbook Pro recently was upgraded to 16GB (gigabytes) of RAM, and another computer in my house has 8GB of RAM. 4GB is probably enough to comfortably run it, but again the idea is the more, the merrier.

Hard Disk

Big and fast – those are the two factors you’re looking for in a hard drive. 1TB, or one terabyte (1000 gigabytes) are commonplace today and give us tons of storage for our photos. With high megapixel cameras, this is so important.

When it comes to speed, you’re probably wanting a 7200RPM drive. Don’t overlook the speed of the drive as a key factor of the computer. The faster the drive, the faster it starts up, opens programs, and generally responds to your inputs.

If you haven’t heard, one of the recent big innovations is the rise of SSD hard drives. I’ve got one in the computers I use, and I could hardly live without it. An SSD is like a huge flash drive that works in place of a hard drive. Because there’s no moving parts, they are much, much faster. However, they are also very expensive compared to traditional hard drives – even though prices are dropping.

System Cleanup

Last year, I made a long awaited switch to Mac. However, I feel that I am still probably stronger on the Windows platform after using it my entire life. I know a lot about Windows, and I know a lot about making it work better.

While I was a Windows user, I was semi-religious about periodically formatting and reinstalling Windows. This means completely wiping your drive and reinstalling from the ground up. Remember how fast your computer was when you first got it a year or 18 months ago? It’s like a completely new start.

This means backing up all of your data you want to keep to an external device, as well as reinstalling everything. If you are fairly handy with a computer, it’s not the hardest thing to do.

In general, try and keep things tidy! Uninstall software you don’t use. Have a good idea of where things are stored on your computer, and clean it out frequently. Set time aside and keep it pared down to the basics. I am constantly trimming down what is stored on my computer, and although it drives me a little insane, I know that my performance is better because of it.

Mac or PC?

Oh boy, I’ve got to tread lightly here. There are few debate that will spark a fire like the debate over which OS platform to use.

I went Mac and never regretted it. However, I think PC is a great platform too. Here’s the thing: all computers are simply the creative tools we use to make our art. I personally felt I could make more art more efficiently on Mac, so I switched. If cash is the most limiting factor you have, get the best Windows PC you can afford.

Wrapping Up

Lightroom is a fantastic program, but it’s only as good as the computer that it’s running on. There are some things in life that I don’t believe in cutting corners on – and a good computer that will last and run fast is one of them.

Filed Under: Lightroom Tagged With: finished

How to Build a Warm Black & White Look

December 16, 2018 by Andrew Leave a Comment

If I could shoot black and white photograph for a living, I would. But as you might have noticed, I also love warmth in photos. 😀 Today, Ill show you how to combine the best of both worlds as we build

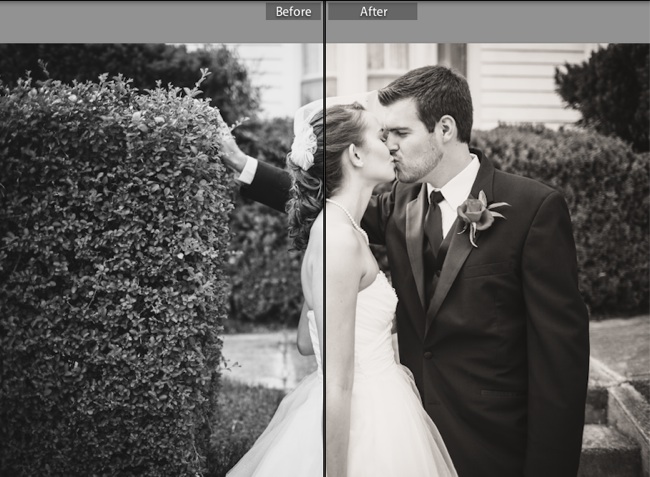
I want to walk you through creating a warm black and white preset. As you might be thinking, this is a black and white look that is pushed just alittle bit to the warm side of things. It’s not quite a sepia look, but has more warmth than the typical black and white treatment.

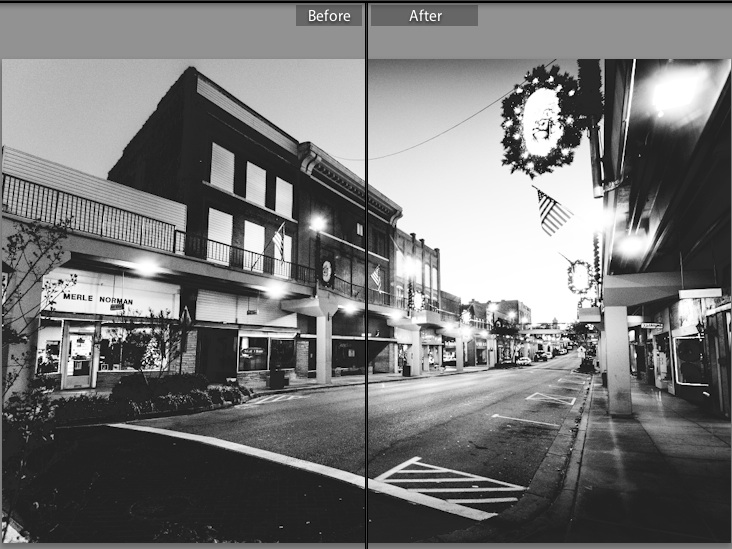
Black White and Warm All Over

At left is a standard black and white treatment, with the right half showcasing a warm tint.

The first step will be to convert your photo to a black and white look. There’s a couple of ways you can do this from the Develop module. There’s some presets that come with Lightroom that are pretty good for getting you to black and white, and the best part is they are applied with just one click. You can also go the long way around and use the Black and White option to switch to a black and white mix that you can customize.

Black and White Treatment Option

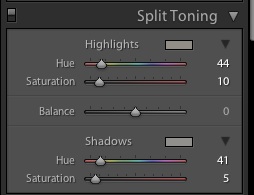
Next up, we’re going to drop down to the Split Toning panel. We’re still working in the Develop module and you’ll find it as you scroll down the right side. Let’s walk through the settings below that we’ll be using.

Below are the tweaks that I used to warm the black and white look. This panel consists of two main parts: highlights, and shadows. Each controls the amount of color added in those regions.

The first thing that we do is pick the hue. We’re looking warm, so I take each of the hue sliders and drag them into the orange region. We are basically adding orange to the photos, although in very small amounts. After getting both of the hue sliders setup, you won’t see a change. We still need to add saturation which controls the amount of color added. I took both of the saturation sliders and moved them slightly to the right to add some color.

Split Toning Warm

Wrapping Up

Using that split toning panel can warm up a black and white look with one quick slider adjustment. Do you like the look of a warm black and white photo? Check in with a comment to let me know what you think.

Filed Under: Presets Tagged With: finished

Super Quick (Impromptu) Slideshows in Lightroom

December 16, 2018 by Andrew Leave a Comment

Lightroom has a full featured Slideshow module for lining up big fancy slideshows. There’s tons of customizations, and I’ll cover that another day, but sometimes you need a quick and easy slideshow. Lightroom has an almost instant slideshow option, called Impromptu Slideshows, that I’ll be showing you today. With it, you can put together a slideshow in less than 30 seconds.

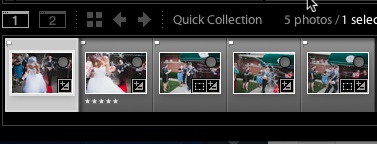
Okay, first thing’s first. You have to get the images you want to use in a slideshow together. When I do this, I usually will just slideshow all photos in the catalog, but you can also put together a quick collection for this. The impromptu slideshow plays all of the images on the filmstrip.

I created a Quick Collection to choose the photos I needed for my Impromptu Slideshow.

After that, you’re one keyboard shortcut away from starting it. The slideshow will start on the image you have selected, and run all the way through. To start the slideshow, press Control + Enter on a Windows Keyboard, or Cmd + Enter on a Mac’s keyboard. You can also go to the menu that says “Window” and choose “Impromptu slideshow” to accomplish the same thing.

Lightroom can take up to a few minutes to build the Impromptu slideshow.

Have you tried out Impromptu slideshows? How do you use them? Leave a comment if you need any help!

Filed Under: Lightroom Tagged With: finished

Upgrading Lightroom 3 Catalogs to Lightroom 4

December 16, 2018 by Andrew Leave a Comment

Hi again everybody! Today I wanted to take a second to answer a quick question users have about using older Lightroom catalogs. With each new version comes a new catalog format, and that inevitably causes some conflicts. When new versions of software come out, many people fear upgrading, especially if they think they won’t be able to use their old files.

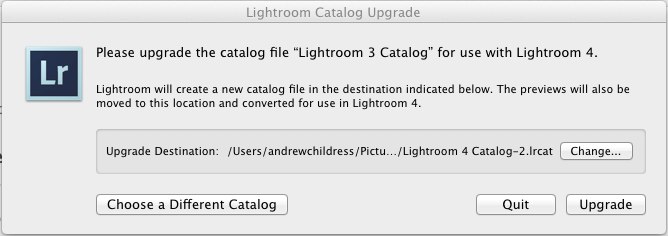
Don’t worry Lightroom fans! I’m happy to let you know that Lightroom 3 catalogs will work just dandy with Lightroom 4, after a quick upgrade. When you attempt to open a Lightroom 3 catalog in Lightroom 4, you’ll get a notice that pops up. One quick note; Lightroom doesn’t destroy your old catalog – when it upgrades it, it leaves the old one untouched, and creates a copy that gets upgraded.

Just go ahead with the process, and you’re upgraded.


One word of warning; you can’t take Lightroom 4 catalogs back in time. That means that once it’s upgraded to the Lightroom 4 format, you won’t be able to use it with Lightroom 3, or convert it to a Lightroom 3 catalog.

One last tip; I find that sometimes after I upgrade a catalog it can be a little slow. I always optimize the catalog by clicking on the File menu and choosing Optimize Catalog. I have no scientific data to back up this method

Have you upgraded all of your catalogs? Will you need to, or are you a recent Lightroom convert? Check in with a comment to let me know how you’re doing.

Filed Under: Lightroom Tagged With: finished

My Favorite Develop Module Tricks

December 16, 2018 by Andrew Leave a Comment

I spend a lot of time teaching people how to use the Develop module, but I’m rarely asked about how I use the various tools. Today, I’m going to show you five of my favorite Develop tricks that help me get my signature photographic looks.

Everybody has got those “go-to” moves in the editing phase. Every photographer I talk to seems to have their own little tricks for their signature look. Today, I’m sharing my five favorite tricks to help you get started with building your look.

1) Post-Crop Vignettes

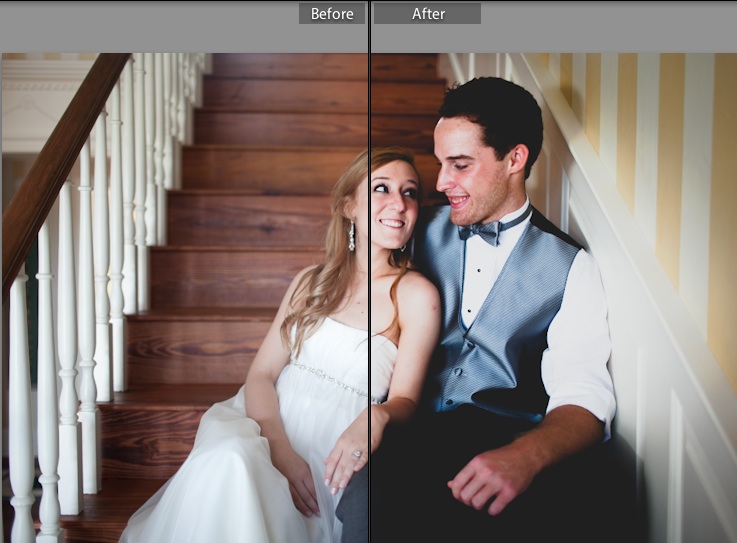
Adding a post-crop vignette is one thing that the majority of my portrait and wedding photos bit. Most of the time, it’s pretty subtle. I love post-crop vignettes because they let me control how someone views my photo. When the edges of the photo are darkened, the viewer’s eye is inclined to move through the photo toward the center and toward the subject.

This image uses a post-crop vignette for an effect.

Find Post-Crop vignettes in the Develop module’s “Effects Panel” on the right side.

2) Tone Curve

The tone curve is probably one of the least understood and scariest tools. You’ve probably never seen anything like it in your image editing up until now, but the tone curve is one of my favorites. I usually will pull the lower left point up a bit, and the upper right point down just a bit for an almost film look that I love.

Wedding Day Smiles Preset

This image used a tone curve to bring in some creamy highlights and shadows.

Find the Tone curve in the Develop module’s “Tone Curve” panel.

3) Warmed Highlights

The Split Toning panel is another underused part of Lightroom for many users. I like bringing a little warmth to the highlights of the photo, so I typically select a warm hue and push the saturation up just a bit. This will make the highlight (bright) areas of the photo a bit warmer.

Warm Highlight Tones

Find the Split Toning panel in the Develop module.

4) A Touch of Clarity

Before Lightroom 4, I wasn’t a big fan of how the clarity slider made my images look. Now, I’m pretty surprised to find how often I use it to add just a bit more “bite” to my images. It gives them a bit of an edgy look and brings the edges to life.

A touch of clarity can make the fine details shine.

Find the clarity slider in the “Basic” panel of the Develop module, in the section labeled “Presence”.

5) A Bit of Warmth

Speaking of warmth, another place that I find myself warming images up is with the white balance tool. Again, I’m a big sucker for warm images, so I typically will push my images a little bit to the right in the editing stage. My clients seem to appreciate this style, and at the risk of sounding cliche, I think warmth gives the images a heartfelt feeling.

Add warmth to photos by adjusting the white balance to the right in the Develop module.

Wrapping Up

Everybody has those million dollar tricks for getting their images looking perfect. If yours aren’t too secret, would you be willing to share with a comment? Let me know what you think.

Filed Under: Lightroom Tagged With: finished

How I’m Using Lightroom Today: Volume 1

December 16, 2018 by Andrew Leave a Comment

Hey again! One of my favorite things to share is how I use Lightroom on a daily basis. I spend a lot of time preaching on ideas, fundamentals, or Lightroom techniques, and I love it when I can actually help users put it all together.

Today, I’m doing some freelance work for a photographer on the West Coast who runs a phenomenal Senior portrait business. He’s outsourcing his editing to focus on photography and building his business, which I think is a phenomenal idea for a lot of photographers. (Just a note, I’ve substituted my own images for the sake of client confidentiality.)

Anyway, I’m working with between 50 and 60 of his images to help him get the images out the door to his client. Here’s the workflow I’ve designed for his images:

1) Import. Pretty straightforward – he sends me images via a shared Dropbox folder, and I grab them from the Dropbox and throw them into a Lightroom catalog.

2) He’s already handled culling (he only sends me images he wants me to edit) so I begin doing basic editing – adjusting crops, white balance, exposure, color, and contrast. Each photo calls for a different recipe to get it looking perfect.

3) Okay, this is where things get a bit trickier. After applying editing to each photo, it gets one of three color labels:

Red – Most photos get a red label because they require some retouching. This means teeth whitening, eye whitening, etc. I’m using the spot retouching tools in Lightroom to do this. I prefer to do all retouches at the same time, so I add the label and then get ready to work on them later.

Yellow – Photos that get a yellow label need to be sent to Photoshop for heavier work – cloning things out, cleaning up backgrounds, etc.

Green – Photos that are finished get a green label! I will either give it a green label right after basic edits, or change red/yellow to green once I’ve applied the retouches.

I use red photos for photos that require spot work in Lightroom, yellow labels for photos to be sent to Photoshop, and green labels are for finished images.

4) Export, email the photographer, and make sure that he is 100% pleased. 🙂

This three color system is really helping me to keep these things straight. I might use this system from now on, or maybe just for today. 😀 Lightroom gives us a framework to create things, and then we can design our own workflows that fit our needs.

Make sense? Any questions? How can I help you learn Lightroom today?

Filed Under: Lightroom Tagged With: finished

Blue Sky Dream Preset

December 7, 2018 by Andrew 2 Comments

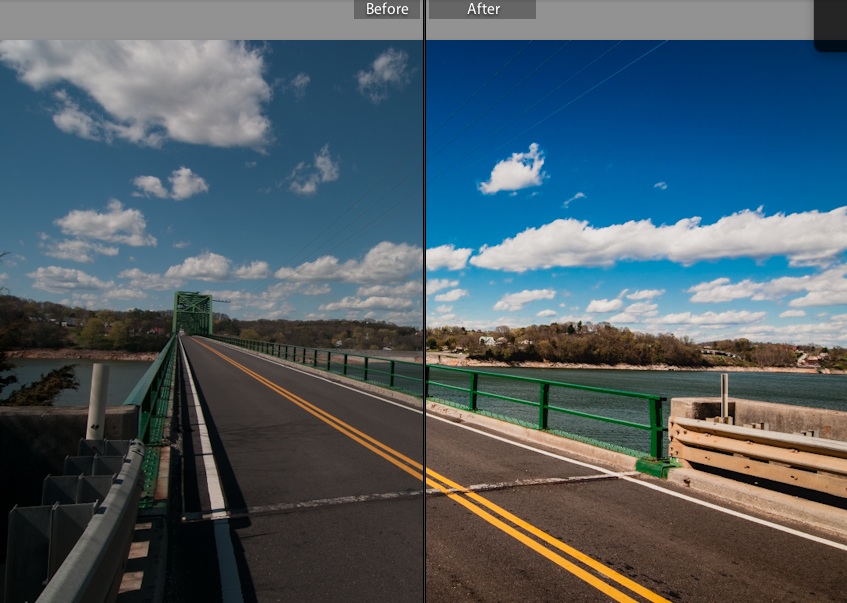
Blue skies are a state of mind. Use this preset for the bluest skies you’ll see, plus a little enhancement to the rest of the photo.

Download

Not sure how to install? Check this article out: How to install presets.

Filed Under: Presets Tagged With: finished

« Previous Page
Next Page »

Search

Latest Posts

  • Merging Catalogs in Lightroom
  • Troubleshooting Lightroom: 5 Quick Fixes
  • Quick Tip: How did I edit that photo?

All Pages

  • About
  • Contact
  • Get Help
  • Home
  • Lightroom Dictionary
  • Sign up For Updates

Copyright © 2023 · eleven40 Pro Theme on Genesis Framework · WordPress · Log in