Lightroom Love

  • Home
  • Presets
  • Get Help
  • Contact

How to use Vignettes in Lightroom

March 15, 2013 by Andrew Leave a Comment

Vignettes are effects applied to the edge of our images, and Lightroom makes it a breeze to apply them. Get excited today about adding yet another visual effect to our toolbelt of knowledge. Let’s take a look at how to use vignettes in Lightroom!

Most lenses are going to vignette your images just a bit. It’s a shortcoming of lenses and it’s something that we can correct. But sometimes, we actually want to add a vignette ourselves. For this, we’ll use a post-crop vignette in the Develop module.

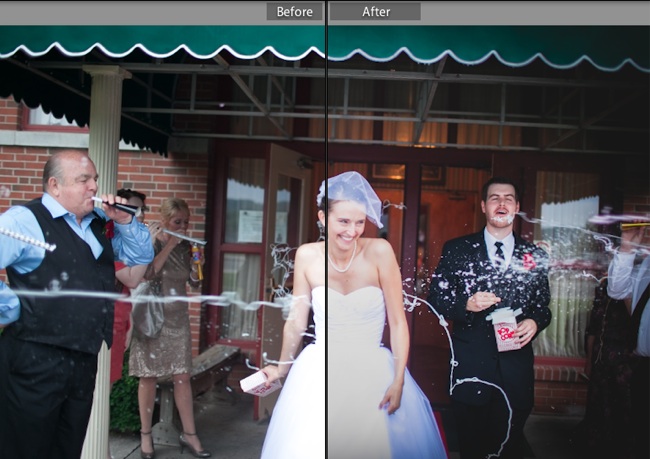
First, let’s take a little closer look at what exactly what the vignette control does. In this frame I’ve take one of my images and applied a moderate vignette to the image with default settings so that you can get an idea for how we can use the post-crop vignette.

Notice here that in the right side of the frame is significantly darker then the left edges. Thus, you notice the edges of the photo far less on the left.

(Lightroom also allows us to apply an “inverse vignette”  by pushing the slider to the right. This gives it a white vigntte. If you would let me interject some opinion here, I think that the white vignette is an awful effect that should never be applied… except for 80’s style glamour portraits.)

I like to darken the edges of many of my portraits because it leads the viewer’s eye into the center of the frame. I’m a photojournalist style wedding photographer and prefer my 35mm lens, so I usually don’t shoot super tight compositions. I use effects like vignettes to lead the viewer’s eye through the frame. When you darken the edges,

I like to darken the edges of many of my portraits because it leads the viewer’s eye into the center of the frame.

To get started with vignettes, let’s first make sure that we are in the Develop module. Now, let’s scroll all the way down until you find the panel labeled “Effects”. Here is where you’ll find the post-crop vignetting tool.

A quick note: there are two types of vignette options that Lightroom offers us. The kind that we’ll be using is a “post-crop vignette”. I think of this as the type of vignette that gets applied for style. There are also vignette correction options that correct opitcal issues. Those only get applied to the original image shape, so cropping could create an uneven vignette. If you’re applying a vignette for style’s sake, stick with the post-crop vignette.

Typically, the default settings are exactly what I use. I don’t spend a lot of time tweaking this. I usually will just grab the “amount” slider, pull it to the left a bit until I like the look, and then call it done. (By the way, I always leave the vignette set to “highlight priority.” Works great for me. :D) For the sake of reference, let’s take a look at what all of the sliders mean:

  • Amount – pretty basic, this is just how much vignette you want. I pull this slider to the left just a bit.
  • Midpoint – this sets the center point of the vignette
  • Roundness – the roundness determines the “shape” of the vignette. Dragging it left makes it more circular
  • Feather – feathering the vignette determines if the vignette is
  • Highlights  – protection of highlight regions
Again, these settings are kind of a lot to tweak, so I almost always stick to just tweaking the amount to the left. 😀

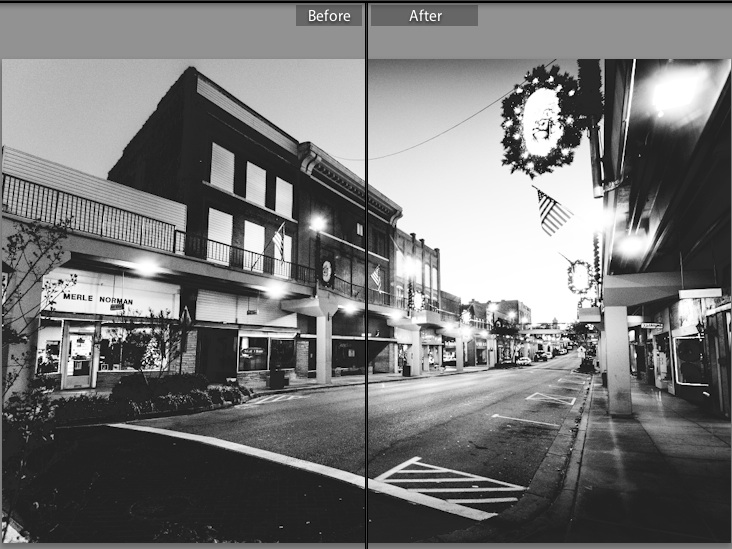
This image (at right) has a heavier vignette to give it a bit of a film noir type look.

Let me share one more important tip for working with vignettes. Lightroom’s color scheme is kind of dark. That means that the area that surrounds your photos is kind of dark, just like the vignette you’re applying. If you aren’t careful, you can overdo it on the vignette without even realizing it.

Are you a vignette user? Leave a comment to let me know your thoughts on using vignettes to enhance your photos.
Filed Under: Lightroom Tagged With: finished

Go Back in Time with Lightroom’s History

March 15, 2013 by Andrew Leave a Comment

Ever wanted to go back in time with your image edits? The History panel is something I’m excited to teach you about today. Let’s take a look at this under-used part of Lightroom.

Lightroom’s History options are so powerful for a number of reasons. We can flip through the states to see what editing settings we have applied to an image, as well as move back to any other previous stage that the image was at. Lightroom is great about automatically creating “states” for each time we tweak an image. Let’s take a quick look at how we can work with the History panel.

To work with Lightroom’s History option, make sure that you are working in the Develop module. We will be going backward (or forward) in terms of the edits that we applied. On the left side of the screen, scroll down until you see the History panel. If it is not already dropped down, just click on the word History to open it up.

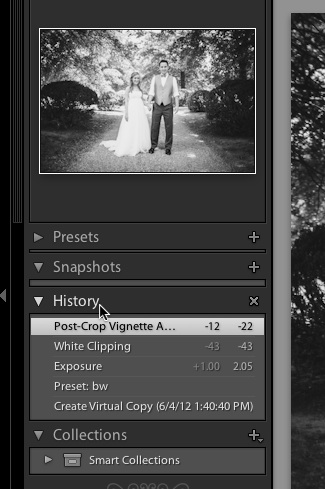
Lightroom’s History panel shows each effect that we’ve applied to an image, step by step.

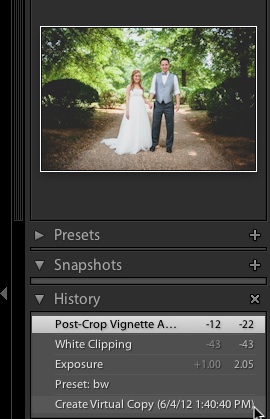
Okay, so you can see here some of the things that I’ve applied to the image. If I want to jump back to an earlier version, just click the stage that you want to do so. Also, a really cool tip here: just hover any of the states in the list, and the thumbnail

Lightroom hover

Hovering over an image state will show the thumbnail of earlier versions of the photo.

The history panel can really help you to track the settings you’ve made to an image to help you think of the settings that you’ve applied to your image. Even if you’re not wanting to move backward with the image at hand, you can study those settings to remind yourself of the settings you’ve applied.

Each step of the image settings can be studied to see what you did to an image.

Again, Lightroom’s non-destructive editing process lets us move back and forth with the edits that we apply. Using the history panel, no image edit is out of reach for correction or adjustment.

Do you use the History panel or are you just finding out about it? The comments are open as always.

Filed Under: Lightroom Tagged With: finished

Filtering Photos in Lightroom

March 15, 2013 by Andrew Leave a Comment

We’ve learned by now that Lightroom has the power to help us work on tons of photos at once. But what if we need to narrow it down to just a certain group of photos or a smaller set of our entire library? There are tons of ways we can do that, and today I’ll show you how with Filtering. 

Quick note here – I’m going to jump straight to teaching you keyboard shortcuts for all of these. It will help you be much faster in the long run. Keep in mind that you can also apply the same settings by right clicking thumbnails in the film strip and finding the option to do so.

First of all, we need to think in terms of the criteria we want to filter by. How are we trying to filter our images? Here are three methods by which we can filter for example that we’ve talked about in the past; some of this will seem like review if you’ve been following our learning, but we’re going to expand today with filtering.

1) Flagged

With the flag system, we assign each photo a flag or no flag. By default, all photos have no flag, or we could say that they are “unflagged”. When we flag a photo, we say that it is “flagged as a pick”. The keyboard shortcuts for this are P (flag / pick) and U (unflag / unpick).  Note: we can also use “x” to flag a photo as a reject, but I don’t see the point in this.

Flag or reject

This is how I handle my images. The way I see it, there are two types of photos from my work shoots: photos I will deliver to my clients, and photos that I won’t. This is how I choose to sort through my photos and I find it works well for my own workflow.

2) Rated by Stars

Stars ratings are another method for setting criteria for images. Images can be set as 1, 2, 3, 4, 5, or 0 stars. By default, photos do not have a star rating.

Filter by Stars

This setting gives the photographer the freedom to rate his or her images on the scale. You can assign stars with the keyboard by pressing the numerical keys 1-5 for the corresponding star count, or “0” to remove any star rating.

3) By Color Label

Another popular method for filtering photos is to assign them colors. Lightroom allows us to assign color labels to photos and then search by the color label.

Filter by Color Label

By default, Lightroom does not assign a color label. We can apply labels with the numeric keypad – 6 for a red label, 7 for a yellow label, 8 for a green label, and 9 for a blue label. Interestingly, purple doesn’t have a keyboard shortcut, so you can right click the photo in the film strip and apply the color label.

Filtering the Images

One of Lightroom’s most powerful aspects is marking them with flags, colors, or stars, and then sorting through them based on what we’ve assigned. It’s quick and easy to narrow down to the criteria we just set.

Okay, first thing is first. It doesn’t matter what module we’re in – these filters are applied using the film strip. (The film strip, by the way, is the strip of photos at the bottom of the page with all of the thumbnails of the photos you’re working with)

In the lower right hand corner of Lightroom, you’ll see the area where filters can be applied. We have a drop down menu that can apply quick filters, but to really unlock the power of the filters, go ahead and click on the word “Filter:”. This opens up a menu that lets you really hit the power of the filter.

Clicking the word “filter” in the lower right hand corner opens all of the filter options.

Okay, now we have the options that we need to filter images down. This is such a powerful way to filter your images. Let’s take a look step by step at the filter options.

Flags

Simple. There are two options here: filter by photos that are flagged, and filter by photos that are rejected. Keep in mind that I don’t use the reject option (I just leave rejects unflagged), so I typically will click the flag on the far left to show all photos that are flagged.

Stars

Stars are applied on a greater than or equal to basis. For instance, picking 3 stars will narrow down photos that are 3 stars or greater and show only those photos.

Color Label

Clicking any of the color labels will filter photos by that color label. Clicking the blue label will filter down your images to photos labeled as the color you picked.

One quick note here: you can click and select multiple color labels to filter multiple colors; for instance, shift clicking red yellow and green labels will include all photos labeled red, yellow, or green.

Filters Stack!

This is one of the most powerful features of the filtering system: the idea that we can apply multiple filters. Want to view photos that are flagged, rated 3 stars or higher, and are labeled purple? Just select all three of those filter options.

Wrapping Up

Filtering is awesome. If you need to get to a specific set of photos, it’s so easy to design a system that will categorize images. Then, using Lightroom’s filter options, you can jump to that subset of photos almost instantly. Keep exploring and thinking about ways that you can use filters to perfect your workflow.

Do you use filtering or need more help doing so? The comments are always open!

Filed Under: Lightroom Tagged With: finished

Rotating & Flipping Photos in Lightroom

March 15, 2013 by Andrew Leave a Comment

Lightroom will usually get my photos rotated and setup properly when we import, but what if we need to make these changes ourselves? Today, we’re doing image gymnastics and taking a look at rotating and flipping images in Lightroom.

Rotating an image allows us to turn it to face the direction that we need. Here’s the controls – Mac users, substitute Command for Control!

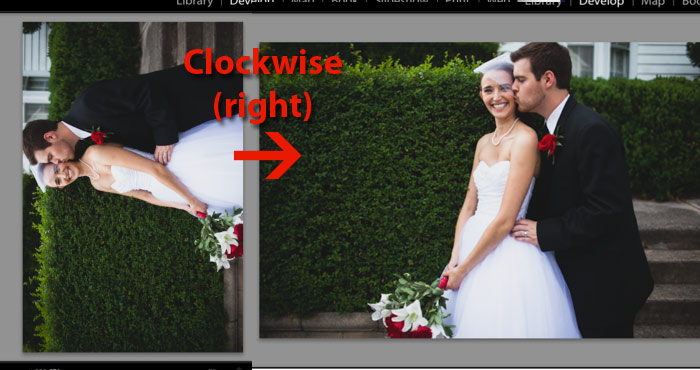
  • To rotate an image clockwise (right), press the Control + ] keys at the same time
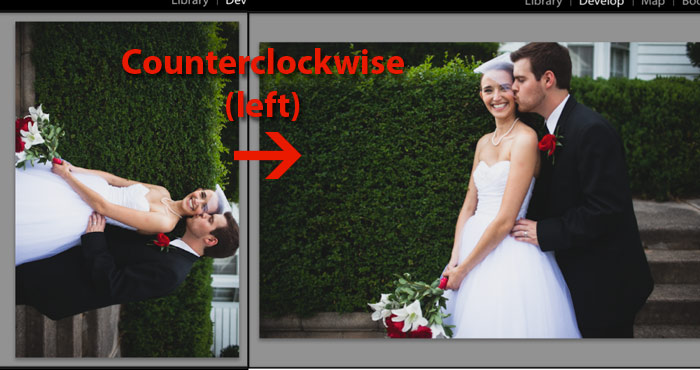
  • To rotate an image counterclockwise (left),  press the Control + [ keys at the same time

Clockwise rotation

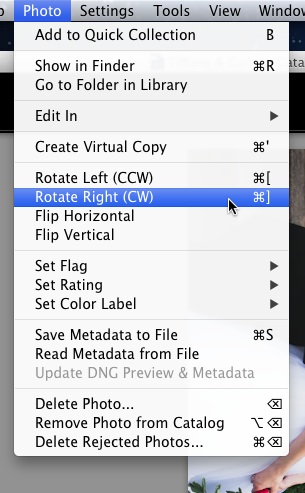
By the way, those are the bracket keys, which you’ll find to the right of the “P” key on almost every keyboard. Those controls can also be found on the “Photo” menu.

Rotate Menu

You can rotate and flip photos from the Photo menu.

As you can see from the Photo menu, you can also flip images, either vertically or horizontally. Think of this as the mirroring effect. We aren’t rotating it, but reflecting it either horziontally or veritcally

  • To flip an image horizontally,  access the “Photo” menu at the top of Lightroom and choose Flip Horizontal
  • To flip an image vertically,  access the “Photo” menu at the top of Lightroom and choose Flip Vertical
Need anymore help? How are you today? Check in with a comment to let me know.

Filed Under: Lightroom Tagged With: finished

Spot Fixes with the Clone & Heal Tools

March 15, 2013 by Andrew Leave a Comment

One of the magical things that photo editing can do is take care of things that don’t belong in our photos. If you’ve ever had that photo that’s been one tiny facial spot away from perfection, you’ll appreciate today’s post on Lightroom spot fixes. 

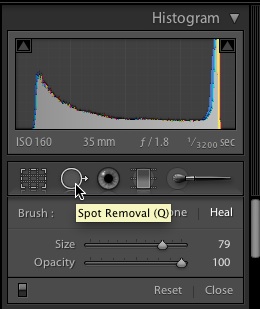
Lightroom has fantastic tools for taking care of spot fixes. It has two ways to remove spots we don’t like: clone and heal.  To use both of these tools, you’ll need to be in the Develop module. You’ll find them just below the histogram on the right side, and all we have to do is click the button to get started, or press Q on the keyboard.

Spot Removal

To use the Spot Removal tool, make sure that you’re in the Develop module and press the button or Q on the keyboard to get started.

Let’s think of the basic concept at hand with cloning and healing. What we’re going to do is take pixels from one area, and use them to fix another area. We’ll call the area we’re sampling from (the good area) the source and the area that we’re fixing the target. Let’s take a look at the tools a little closer:

Cloning is going to copy one area of a photo to another area. This is a direct copy from one area to another, with the source area being cloned to a target area.

Healing is a little smarter. I usually recommend using the healing brush when we’re working with skin. What the healing does is build a texture from the source area

For both of these brushes, we have two options we can change:

  • Size – simply changes the size of the area we’re cloning / healing to and from
  • Opacity – opacity is how transparent the brush is. Setting the brush to anything less than 100 is going to make it so that the original is partially transparent
Let’s move step by step through fixing a spot on my subject’s skin:

1) Set your brush up selecting the size and opacity. I’m working on fixing a small spot on skin, so I’ve selected the healing brush.

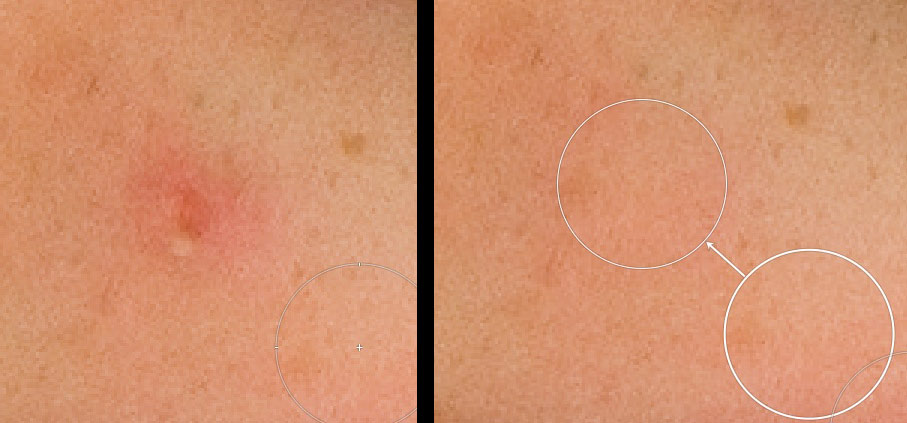
2) Click the area you want to fix.  Lightroom automatically selects the area to sample from, and puts in the replacement pixels.

On the left is the before region. Clicking on the spot I want to fix caused Lightroom to automatically select an area to heal the skin from. If it guessed incorrectly, I would simply drag the replacement circle to some other area to heal from.

Let’s suppose that Lightroom didn’t make a good guess as to where to sample from. No worries – this is an easy fix, and a really cool feature. All that you have to do is click on the “sampled from” circle and reposition it. Just drag it to a better spot to clone from, and you’re good to go. You can also change the size of the circle on the menu, even after you’ve placed it.

The clone tool is used when we don’t want to use the texture as well. When we want to directly copy one area to another, the clone tool is the way to go.

Wrapping Up

Lightroom’s spot fix tools, clone and heal, and pretty fantastic for taking care of most spot fixes. It’s really intuitive to use and not hard to tweak.

Need more help with the spot cleanup tools? Leave a comment if there’s anything that I can do to help.

Filed Under: Lightroom Tagged With: finished

Getting Colorful With Lightroom Color Labels

March 15, 2013 by Andrew Leave a Comment

As photographers, I think we’re wired to think in terms of color! (Although I do love a good black and white. :D) That’s why I love using color labels in Lightroom. Today, I’m taking a look at how you can use apply color labels and make them useful to you in your workflow.

As we’ve talked about a few times before, we use Lightroom and the Library module in particular to help narrow down our image sets smaller and smaller so that we can work with our best images! Color labels are one system we can use to tag images.

Filter by Color Label

Before we really dive in, one thing I want to encourage you to think about is the ways we can use color labels to power up our workflow. Again, I think the best way to think of it is using the label to attach some meaning to the photo.

Here’s some ideas for how you can make color labels useful to your workflow:

  • Tag images for more editing in Photoshop
  • Mark images that you will deliver to your client
  • Use a color for your absolute best images

I think another great way to use labels is to use them as a “temporary” marker. When I need to send some images to Photoshop later for editing, I’ll give them a blue label. When I’ve finished my work in Lightroom, I’ll simply filter to the blue labeled images and send them all out to Photoshop at once.

As always, you can bend the tools that Lightroom has to your workflow. Everyone’s needs are different – understand the concept of the color labels and do some creative thinking on how you could use them in your own workflow.

Setting Color Labels

Let’s get started! By default, photos have no color label, but setting color labels is super easy. With any photo selected, we can use the numbers on our keyboard to apply labels:

  • Press “6” to apply a red label
  • Press “7” to apply a yellow label
  • Press “8” to apply a green label
  • Press “9” to apply a blue label

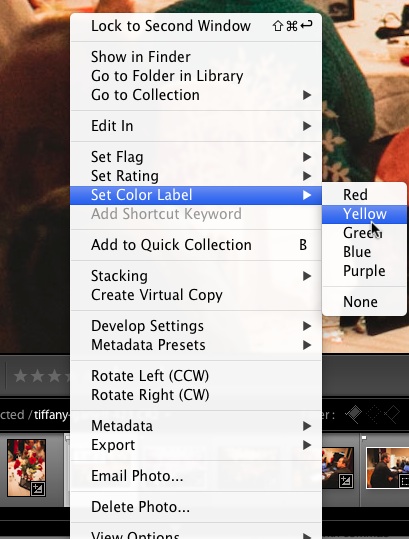
Oddly enough, purple labels can’t be applied with the keyboard. We can set a purple label – or any other color label – by right clicking a photo in the film strip and choosing “Set Color Label”, then the color label we want to apply.

Right click label

Right click a photo in the film strip and choose “Set color label” to apply a color label.

Filtering

Once photos have color labels applied to them, it’s so easy to search out and sort by the colors of the label. Near the lower right hand corner of the application near the “filter” selection, pressing the word “filter” causes more options to pop up. After that, you can click the color labels that you want to filter your images to. You can even click several and filter it down to several labels.

Clicking the word “filter” in the lower right hand corner opens all of the filter options.

Wrapping Up

I love color labels as a way to set aside images or assign them some type of significance. We all work with lots of images, and sometimes we need to create a way to label smaller sets of images. Color labels are an easy (and visually appealing!) way of doing so.

Do you use color labels? Need more help? The comments are open for your thoughts!

Filed Under: Lightroom Tagged With: finished

How to Organize Lightroom Presets

March 15, 2013 by Andrew Leave a Comment

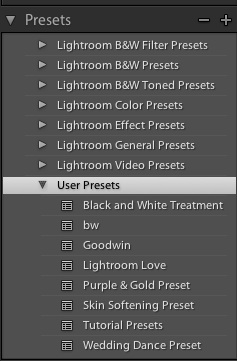
It’s easy to pile up tons of Lightroom presets. They’re so handy for editing images and applying styles that it’s easy to see why you’ll rack up tons of them! Luckily, Lightroom allows us to organize these presets really easily, right inside of the program.

First of all, make sure that you are in the Develop module, and viewing the presets panel on the left side. This is where we can do all of the organization of our presets.

So let’s say that our “User Presets” folder has piled up a few presets like mine has, and I want to organize them.

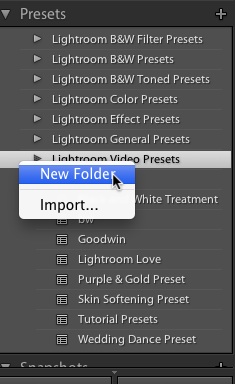
We can use the preset folders to keep things nice and tidy. Right click (or command click on a Mac) next to an existing preset folder to pop up a new menu. Choosing “new folder” will open a box to allow you to give the folder a name.

Now, all that we have to do is drag and drop presets into the new folder to reorganize them! We can literally click on a preset name and drag it into the new folder that’s been created.

Another thing – once we’ve cleared out a folder of all of the presets, you can follow the same right click procedure to delete the folder if you’re looking to clean it up. Take five minutes and clean up your presets for quicker working in the future!

Need more help organizing? Leave a comment and I’ll get back to you ASAP.

Filed Under: Presets Tagged With: finished

Give Lightroom Your Personal Touch with Identity Plates

March 9, 2013 by Andrew Leave a Comment

I want Lightroom to feel like home, so I like giving it touches that make it “branded” for me. If you’re using Lightroom to show off pictures to clients, you might want to customize it to show off your logo and brand.

IMAGE HERE WITH OUTCOME

One of the options Lightroom has is to customize the identity plate. The identity plate is the area that you see in the upper left hand corner that usually has the Lightroom logo. When we go custom, we can replace that logo with anything that we want!

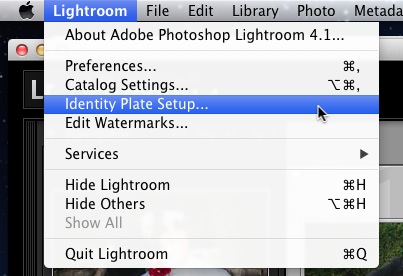
To get started, you’ll need to hit the settings. On Windows, go to Edit, and choose Identity Plate Setup. On Mac, choose the Lightroom menu and choose Identity Plate Setup. 

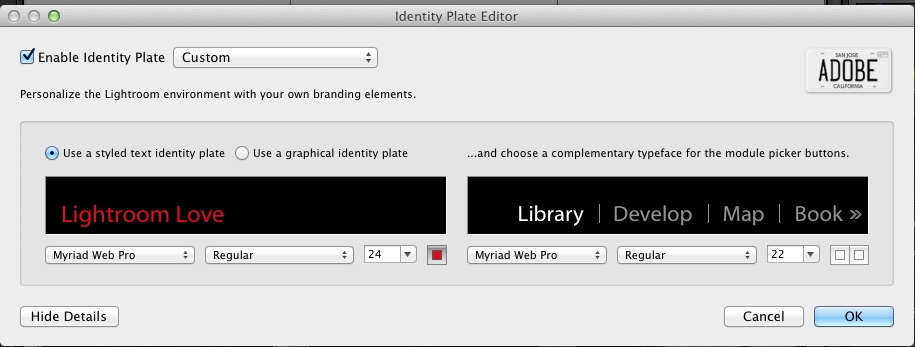
After you’ve entered the options, you’ll see a menu that has a couple of different options. The first of these is to create a custom text based identity plate. This is actually pretty cool because we can use any fonts and colors to build an identity plate. If you have a pretty simple logo, you can probably build it entirely by choosing fonts and text colors.

Have fun playing around with some of the text options that we can use in the Identity Plate Setup.

One important thing is that after we build the identity plate, you save them. That we, we can just use the dropdown menu and jump back and forth to any of the identity plates that we’ve built.

If you want to go more complex, you can also build a graphical identity plate replacement. If you’re going with an “image” type plate, I would recommend popping into Photoshop or another graphics program and creating a graphic to use. Another thing is that we will want to save this as a PNG with transparency so that it appears correctly in Lightroom without a white or black background.

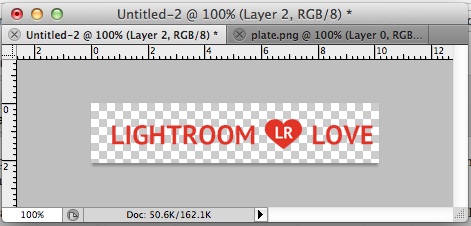
I’m going to get started in Photoshop and start on a canvas that is 288×60 pixels, with a transparent background. I’ve heard people throw around a lot of different sizes, but that’s what works great for me. After opening the canvas, I can drop in the logo and graphics that I want to use for my identity plate.

Photoshop Canvas

Dropping the logo on a transparent canvas is the way to get started. A 288 by 60 pixel canvas is perfect from my testing. Leave the logo a little bit of space on the left side!

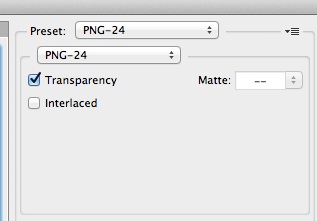
As I wrap up with creating my identity plate, it’s time to save it. In Photoshop, I’m going to go to File and choose Save for Web & Devices. Make sure that you choose a PNG-24 and make sure the Transparency box is checked. Save it somewhere you can remember.

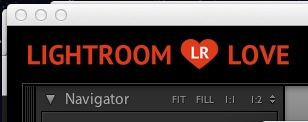
Next, switch back to Lightroom. Choose the box that says “use a graphical identity plate.” Now, click Locate File and point Lightroom to the identity plate graphic that you just saved from Photoshop. Presto! You’ve now got your custom logo as an identity plate.

Custom Identity Plate

Note that you can also use a custom font for the name of the modules. On the right side of the options, just choose a font and the menu’s will change to the font of your choice.

Wrapping Up

With a little bit of work, you can customize Lightroom with customized graphics. If you’re going to be spending a lot of time in Lightroom, it can make it feel a bit more like home! 😀

Will you use this? Leave a comment if you need any help.

Filed Under: Lightroom Tagged With: finished

Lightroom 4 – Fast or Furious?

March 8, 2013 by Andrew Leave a Comment

I admit it, I’m a Lightroom addict. (Lightroom 4’s release was like a holiday for me. I took the day off of working in Lightroom to spend time with Lightroom. 😀 ) I spend tons of my free time browsing forums, reading other Lightroom user’s thoughts.

The new version has brought with it a lot of good changes. But there are some who believe that the newest version of Lightroom is significantly slower than earlier versions. Many users chimed in on Fred Miranda’s forum to share their experience, with some experiencing slowdowns and others saying that the app is working fine.

Today, I wanted to take the time to ask my readers about your experience with the speed of Lightroom 4. Do you find it to be faster or slower than older versions?

Filed Under: Lightroom Tagged With: finished

Create Multiple Edits with Virtual Copies

March 8, 2013 by Andrew Leave a Comment

Lightroom’s virtual copies let us make multiple versions of an image. We can create two different versions of a photo and edit them separate from one another with just a couple of clicks.

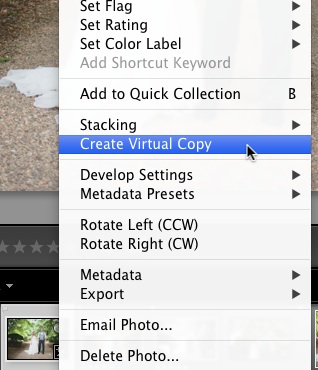
Okay, so this is super simple. All that we have to do is right click an image on the film strip (the row of photos at the bottom of Lightroom) and choose to create a virtual copy.


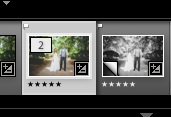
Now, you’ll see a duplicate of your photo on the Film Strip. The two copies of the photo can be edited independently and will preserve the original copy.

Lightroom virtual copies

I could write a lot more about virtual copies, but I think this is is one of those self-explanatory features that Lightroom has. No long-winded tutorial needed. 😀

Do you use virtual copies?


Filed Under: Lightroom Tagged With: finished

« Previous Page
Next Page »

Search

Latest Posts

  • Merging Catalogs in Lightroom
  • Troubleshooting Lightroom: 5 Quick Fixes
  • Quick Tip: How did I edit that photo?

All Pages

  • About
  • Contact
  • Get Help
  • Home
  • Lightroom Dictionary
  • Sign up For Updates

Copyright © 2023 · eleven40 Pro Theme on Genesis Framework · WordPress · Log in