Importing images into Lightroom is essential. If you’ve never worked with adding images, importing them into Lightroom simply means that we’re showing Lightroom where our images are stored, and adding them to the catalog. Remember that in our discussion of catalogs, we learned that each catalog stores information about our images.
A lot of people don’t understand how importing works unfortunately, but we’re going to really dive deep on it today.
When we get started with a Lightroom catalog, we won’t have any images in it. We use importing to add images to the catalog so that we can tag, edit, and more. They have to be imported before we can do anything with them in Lightroom.
Importing
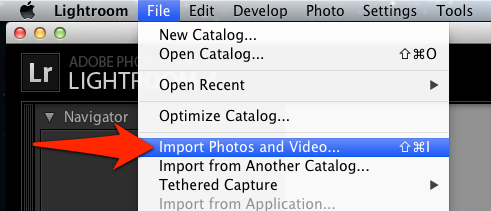
To get started with importing images in Lightroom, access the File menu and choose Import Photos and Video.
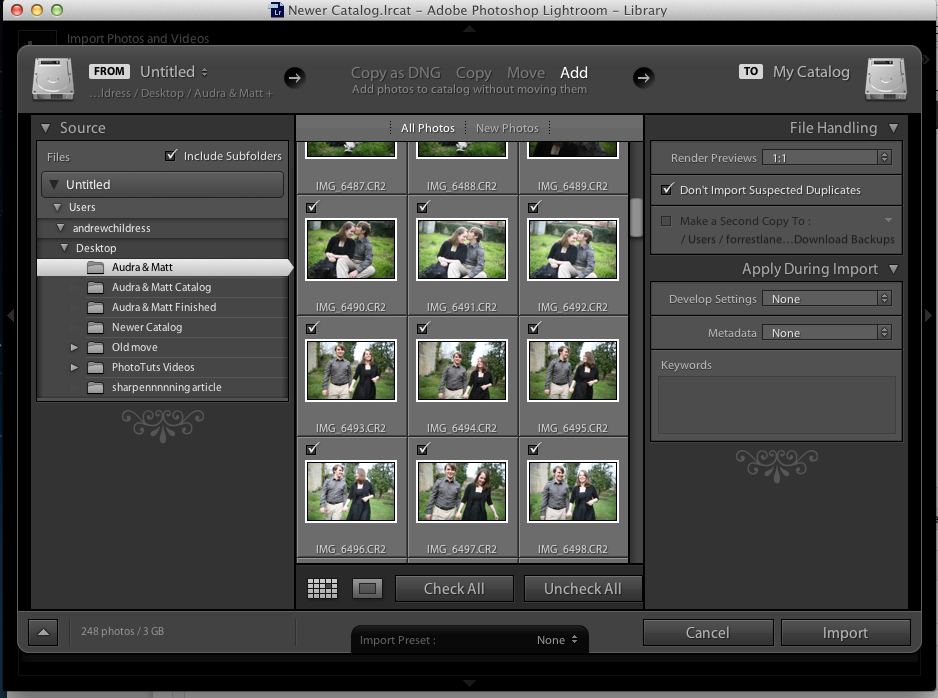
Once we’ve chosen that from the menu, the import menu will appear and we’re ready to get our images added.

The Lightroom import menu can be a little overwhelming at first, but we’ll take it one step at a time today.
1) Image Location
On the far left of the import menu is what I call the “image location” area. This is how we show Lightroom the images that we want to add to our catalog. When it comes to importing, Lightroom can add images directly from a memory card, or add images that are already on your computer.
If you have a camera plugged in or a memory card in a reader, it will automatically default to pulling the images from the camera or card. Otherwise, you can browse to where the images are stored and choose the folder to import images from. Make sure you’re mindful of where you put your images on your computer!
Personally, I don’t like using Lightroom to copy images directly from a card. I would rather just plug my memory card in, and drag and drop to where I want the images to be stored. I actually usually keep my shoots on the desktop until I file them away onto my backup drives, but that’s just my personal system.
2) Copy, Move, or Add?
One of major decisions to make when importing is what we want the import menu to do with our images. We have three choices: copy, move, or add (let’s ignore the Copy as DNG option for now). Each option adds the image to the catalog, but has different effects on the image file:
- Copy – leaves images in the original location, and creates a duplicate copy elsewhere
- Move – moves the image from the folder it’s stored in, to another folder that you choose
- Add – doesn’t move the image at all, and simply adds it to the catalog
If you’re pulling images from a camera or card, you can only choose “copy”, because Lightroom won’t add images from a card to a catalog until it creates a local copy.
Personally, I use “add”, because I’ve already chosen where I want my images to be stored by just dragging and dropping them. If you’re copying or moving images, you’ll need to choose where the images are going by clicking the drive symbol on the far right:

If you’re moving or copying images, you’ll need to tell Lightroom where you want those images to go by clicking the drive on the far right and choosing a destination.
3) The Details
We’ve now tackled the hardest parts in my opinion: where images come from and where they’re going. Other than that, we’ve got just a few more optons on how we import our images.
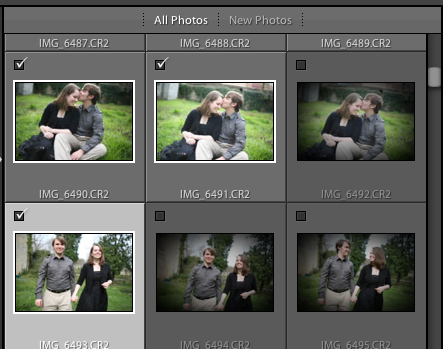
In the center area, you’ll see boxes with previews of all the images we’re importing. This is how we know what images are potentially being imported. We can selectively choose the images, utilizing the check boxes next to the images to choose what gets imported:
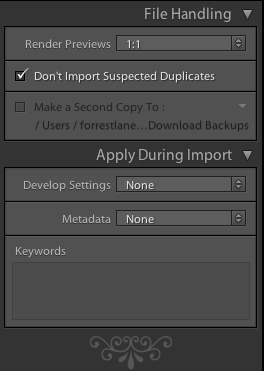
On the far right hand side are a list of other options that we can tweak for results. Let’s take a look:
On this menu are a list of settings we can apply, and simplify for today’s walkthrough:
- Render previews: choose minimal for the smallest previews in file size, but the slowest ones to load. 1:1 previews take some time to render and lots of space, but make working through images quick.
- Checking “Don’t import suspected duplicates” will make sure that we don’t have duplicate images in our catalog
- Apply during import lets us add Presets, Metadata, and Keywords as we import. We will study more on this later.
Importing is no small task, and I think that some Lightroom users get stuck on this stage and never move past it, and thus never start using Lightroom! I hope that this post has been helpful in getting started with importing, but if there’s anything I’ve left unclear or your need more information importing images, feel free to leave a comment and help me do a better job helping you.


