Lightroom Love

  • Home
  • Presets
  • Get Help
  • Contact

Merging Catalogs in Lightroom

May 1, 2020 by Andrew Leave a Comment

Catalogs are the backbone of managing photos in Lightroom. They contain all of our editing data, holding basically everything that we need to get RAW images to our clients! Managing multiple catalogs can get to be a lot of work, so today I want to take a look at how to combine catalogs.

Personally, I keep a lot of catalogs. Sometimes it gets to be a lot to handle, and I want to consolidate! So let’s say that we have a situation where we have two separate catalogs, and we want to combine them. We’re going to use Lightroom’s “Import from Catalog” feature to do that.

The best way that I can explain these things is to relate it to my own workflow. Let me tell you how I manage my weddings.

Each wedding is going to get its own catalog. I do this because weddings are huge! It doesn’t make sense to have to go through a wedding I shot six months ago all while editing last week’s wedding.

However, it’s also really handy to flip through all of my wedding photos at the same time! As I’m sure you know, it takes a few seconds to close down one Lightroom catalog and open up another, and when I need to pull the best images for portfolio or marketing purposes, it really helps to be able to have all of my images in one catalog.

So what I do is edit an entire wedding, then plan on “pushing” that catalog into the big catalog. We’ll call this the Wedding Master catalog. Each catalog that we merge into it is a smaller catalog.

To visualize, this is how I like to run my catalog system:

(image here)

There’s one quick note that we need to be aware of: these catalogs don’t stay synced. Let’s say that we merge a smaller catalog into a master catalog. At that moment, all of our settings are migrated. That includes all of our exposure and color adjustments, stars or tags we’ve applied, etc. However, if we go back and make changes to the smaller catalog, it doesn’t update those changes in the master catalog.

Wrapping Up

Juggling tons of catalogs can be a lot of work when you need to pull the cream of the crop. Although I use separate catalogs to protect my data when editing weddings, missing out on the power of consolidated catalogs is ignoring much of the power of Lightroom.
Filed Under: Lightroom Tagged With: needs images

Quick Tip: How did I edit that photo?

March 31, 2020 by Andrew Leave a Comment

Looking to find out the settings you’ve applied to an image in Lightroom? Sometimes we forget and want to remember how we got that perfect look for our image. I’ve got a really quick tip for you today that will help you do just that.

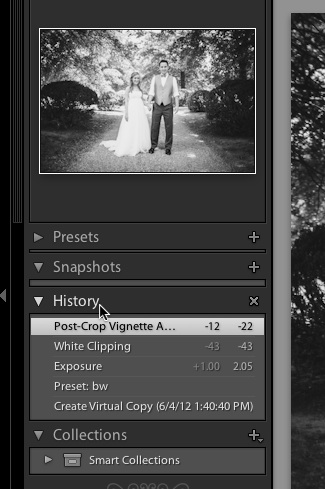
To do that, we use the History panel in the Develop module. Go ahead and open it by clicking on the word “history” if it’s not already visible.

Lightroom’s History panel shows each effect that we’ve applied to an image, step by step.

Now, it’s clear the settings that we’ve applied to a given image. Let me walk you through how I modified this image:

  • I created a Virtual Copy to work with a separate edit of the image.
  • I applied a preset that I call bw that gives my images a black and white effect
  • I added +1.0 stops of exposure to brighten the photo up
  • I played with the whites setting, bringing it down by a value of 43
  • I added a post crop vignette, with a value of -12

Using this history panel, it’s so easy to find out how we treated an image, and presumably make notes about how to achieve the same look with other images. This is also a great time to build a preset! (Hint, hint.)

Filed Under: Lightroom Tagged With: finished

How to Rename Lightroom Catalogs

March 1, 2020 by Andrew Leave a Comment

You may occasionally need to change the name of a Lightroom catalog. Maybe you made a typo or need to clean up a long folder name; either way, Lightroom doesn’t offer an easy way to do this from within the program. We’re looking today at how to do it manually.

First up, you need to browse to wherever you have your catalog stored. When you created a new catalog, you had to choose a location to store the catalog. If you’ve forgotten where you stored it, I would suggest doing a search on your computer for your the catalog name.

If you lose track of the current name of your catalog, just check the top of the Lightroom window in the center.

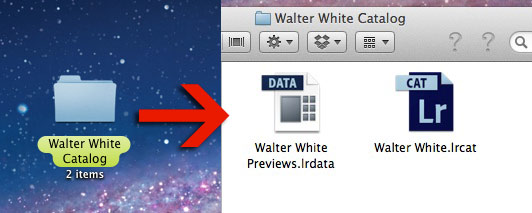
Okay, once you’ve tracked down the folder with the catalog, this is how Lightroom catalog folders are typically setup: when we create a new catalog, it creates a folder with two files inside of it. All three of these share a common name, with a few slight differences. Here’s how a typical catalog folder looks:

This is how Lightroom catalog folders typically look; inside are two files: a catalog file (.lrcat) and a preview files, with the .lrdata at the end. We need to rename all of these to rename the catalog.

First, make sure that we’ve shut down Lightroom. Next, we’re ready to start the renaming process. I will rename all three of these files to a common name. Now, it’s important to keep the parts that Lightroom has added the same. For example, on the Previews file, called “Walter White Previews.lrdata”, it’s important to leave that “previews” bit the same.

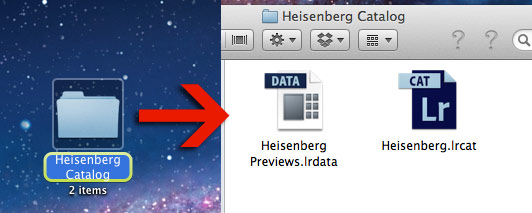
Basically, for this rename, I’m changing all instances of “Walter White” to “Heisenberg”, and leaving everything else untouched. Simple enough, right? This is how it looks after renaming.

I changed all instances of “Walter White” to “Heisenberg” and left everything else untouched.

The next time that we open that catalog in Lightroom, you’ll notice that it has recognized that we changed the catalog’s name at the top of the program.

All told, you can get a catalog renamed in around a minute once you know how! Honestly, I’m hoping that Adobe makes it even easier than this in the future.

Are you having any issues getting this done? Feel free to let me know in the comments.

Filed Under: Lightroom Tagged With: finished

Mastering the Detail Panel

February 16, 2020 by Andrew Leave a Comment

Photographers are always trying to draw out the finest parts of their prized photos. In Lightroom, we handle that efficiently with the Detail Panel

You’ll find the Detail panel in Lightroom’s Develop module. It’s what we use to handle the fine details and enhance the finer points of our photos. The Detail panel has two main functions: sharpening and noise reduction. Let’s take an in-depth look at what each of these does, and how we can use them.

Sharpening

Sharpening is for enhancing the detail of our photos. We can draw

The sharpening portion of the detail panel has four factors that control how we sharpen the image:

  • Amount – this is pretty basic
  • Radius – 
  • Detail – 
  • Masking – 

Tread carefully with the sharpening function! I know so many photographers who try to restore sharpness to a blurry photo. This isn’t an instant fix slider. As is the key with all edits, we can only enhance what we got with the camera to begin with.

Noise Reduction

Noise is a fact of life in photography. The higher we set our ISO value or the more that we tweak exposure, the more noise that our photos will show. Newer cameras manage noise better, but you’re still going to see it.

(image here of what noise looks like)

The good news is that Lightroom 3 introduced some really impressive noise reduction, and Lightroom 4 has helped grow that even further. With this feature, we can remove the noise in our images and clean them up nicely.

The issue is that when we remove noise, we’re also removing detail from the images. Software has a hard time balancing removing the bad detail in the form of noise with preserving the detail that we want in our images.

Noise reduction has five factors that control how we remove detail. In general, moving the slider further to the right increases noise reduction.

  • Luminance – 
  • Detail – 
  • Contrast – 
  • Color – 
  • Detail – 
Typically,

Wrapping Up

The Detail panel is important for managing the sharpening and noise reduction of our images. Each image is going to require some different settings to get it twaeked perfetly. Remember to work at a close level of zoom and tread lightly to

Any questions about the Detail panel? How can I help you understand it better? Check in with a comment so I can help you love Lightroom.

Filed Under: Lightroom

Exploring Lightroom’s Panels

January 16, 2020 by Andrew Leave a Comment

I like to write things that help my readers understand how Lightroom is put together. It’s almost impossible for me to teach you everything in Lightroom, but I can teach you to think your way through Lightroom. Today, I want to kickstart how you think about the panels that make up Lightroom.

If I’ve said it once, I’ve said it a million times: this program is built smart.Things get grouped together that seem to make sense. As we’ve talked about before, Lightroom is divided up logically across the modules. Things that help us to organize are grouped into the same module.

Beyond the grouping of the modules, controls are grouped together intuitively in the panels of Lightroom. You see, each module is made up of panels. Let’s take a look at just a few of the panels that you’ll find in Lightroom.

Library Panels

Quick Develop

Quick develop is a panel that lives in the Library module. Although most of our images adjustments are made in the Develop module, Quick Develop gives us the chance to adjust images a bit in the Library module. Basic exposures like exposure, clarity, and vibrance are just a click away.

Keywording

Keyword List

Metadata

Develop Panels

Basics

As we know, there are even more modules that have more panels that form the foundations of Lightroom. You certainly don’t have to memorize them all, but learning to think in terms of modules is really helpful to getting the hang of Lightroom.

Wrapping Up

This blog is all about training you to think in the way that Lightroom works. As you think of different things you might need to adjust in the photo, consider the panel that will help you achieve what you want. Learning the layout of Lightroom will help you use it much more rapidly than hunting through modules all the time.

What panels do you spend the most time in? If you need any more information, feel free to drop a comment.

Filed Under: Lightroom

How to Install Lightroom Presets

January 1, 2020 by Andrew Leave a Comment

If you’ve been wanting to learn how to install Lightroom presets, make sure and check this out!

Filed Under: Lightroom

5 Steps to Faster Culling

December 16, 2019 by Andrew Leave a Comment

Every step of our photo editing process is important., but there’s something essential about culling. Culling, the process of cutting down our shoot to our “keeper images” is where big decisions get made about which images will make the cut.

The problem with culling is that it’s time consuming. It takes serious time – and energy (in the form of decision making) to get our keepers cut down. Today, I’ve got five of my favorite tips for how to expedite this process.

1) Do it all at once.

After I throw a series of images into Lightroom, the first thing I do is cull in the Library module. Period, no questions asked. I won’t do any editing (Develop module) work until I have my images narrowed down to exactly what I need post-culling process.

Before adopting the “all at once” approach, I spent too much time jumping around in Lightroom. I might cull for an hour, edit those photos, export etc. Terrible approach – knock out all of your culling all at once.

2) Build a system.

Photographers have all types of systems for culling their images. Some use flags to mark keepers, others use color labels, and still others like to use the star system. Whatever route you want to take, make a choice and stick with it! The more that you can learn your routine, the more you can reproduce it. Routine helps us keep our creative thoughts organized.

Filter by color label is one system photographers use to cull.

3) Use the keyboard.

I can’t say enough about the power of the keyboard shortcuts that I’m always talking about. You don’t realize how much time you lose by moving your hand back and forth to the mouse. A quick refresher on a few keyboard shortcuts:

  • Flag: P to mark as a pick, U to unflag a photo
  • Color labels: use the keyboard numbers 6, 7, 8, and 9 to apply color lables
  • Star ratings: use the keyboard numbers 1-5 to apply star ratings

When it comes to culling, I think that using the keyboard is the only way to go. Here’s a quick tip for you, free of charge! When culling, make sure Caps Lock is on on your keyboard. This auto-advances you to the next photo to mark it is a pick, give it a color label, etc.

4) Be confident.

This might sound like a silly tip, but this is one thing that I used to miss out on. I would deliberate or agonize over “should I keep this one or the one right after it?” and find myself taking forever to finish culling.

We’re digital these days. If I find that I’m missing a photo in my the editing stage, I simply switch back and add that photo to my selections. Do we want to get the cull right the first time? Absolutely. But we aren’t dealing with life or death, one time opportunity type work here.

5) Enjoy it!

This might not make it faster, but it will certainly make the time pass more rapidly. Culling is rarely mentally-intensive work, so I almost always have something going in the background. A good episode of SVU on Netflix or one of my favorite stations on Pandora has set the stage for lots of long nights of getting my favorite photos picked for Development.

What are your favorite culling tips? What challenges you to get your work done?

Filed Under: Lightroom Tagged With: finished

Make Lightroom Work For You!

March 2, 2019 by Andrew Leave a Comment

A reader recently wrote into me with the following message:

I love the blog. I’m learning so much about how to use Lightroom. I can follow all of the guides, but my photo life is still a mess. I know how to do things, but not how to use them on my own images.

The truth is that I can only dole out so much advice. As you’ll often see me write in my posts, I will give you advice based on how my workflow works. There’s a problem with that though.

I don’t shoot like you. I shoot different things, with different cameras and onto different computer systems. If you try to copy me, it won’t work as well for you. It’s not because my workflow is great (it’s certainly not), it’s because the core worth of the workflow is that it meets our needs as a shooter.

I can only do so much to provide help. I used to be like you – I would follow tutorials and guides to a “T”. And yet, it didn’t help me to solve my problems or increase my creative work. The issue is that I was so busy trying to imitate others, that I didn’t innovate on my own work.

The issue is that I was so busy trying to imitate others, that I didn’t innovate in my own work.

I hope you will explore the site and take a look at the advice I offer, as well as the way that I recommend doing things. But you’re going to have to work with your own images to get the hang of how to apply all of your knowledge. Make Lightroom work for you.

I won’t ever claim that anything I do is the best way to do something. I create solutions to my own issues. My posts, I think, are a good mix of how to do things and why to do them. If you understand the techniques and steps to take to accomplish things, you might begin to understand how you can apply them to your own image needs.

With all of that said, I’m always available for help. Check in in the comments or shoot me an email on the contact page so we can help you do what you do.

Filed Under: Lightroom Tagged With: finished

Building Keyword Sets in the Library Module

January 20, 2019 by Andrew Leave a Comment


A little while back, we got started with using keywords to add tags to our images. A lot of my readers wrote in to thank me and shared that adding those keywords makes their images a lot more searchable.

However, it wasn’t all good feedback. You see, although keywords are useful, they can be really time consuming to apply! Today, we’re looking at using keyword sets, my favorite trick to cut down on keyword work.

What are keyword sets?

In short, keyword sets are groups of keywords that we can create and keep handy. Instead of adding “wedding” to every image, and then “June” to every image, we can put both keywords in a keyword set and put the set at our fingertips.

When we build keyword sets, we want to keep them fairly “high level.” That means keeping the keywords we use general. We would want to add “wedding” as a keyword, but probably not “flowers” since that won’t apply to every image.

Building a Set

When it comes to keywording, we are going to be doing all of our work in the Library module. This is where we handle the data that’s tacked on to images, and keywords are a perfect example.

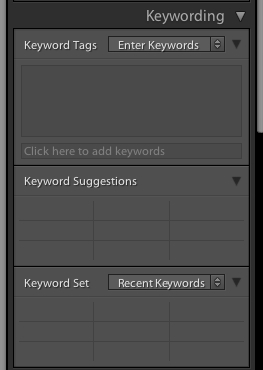
To build a keyword set, first find the keyword panel on the right side of Lightroom’s Library module.

You’ll find the keywording panel on the right side of the Library module.


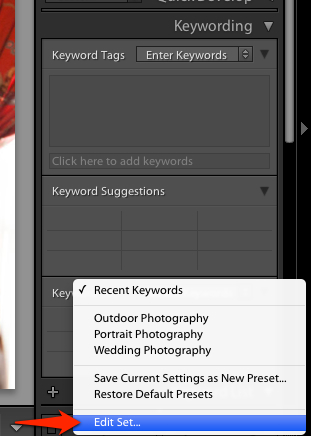
To get started with building your own keyword set, go ahead and click the dropdown arrow next to “Recent Keywords”:

Click the arrows to the right of “Recent Keywords” in this screenshot to get started with building a set.

Next, choose “Edit Set” on the menu that pops up:

Choose edit set on the menu that pops up.

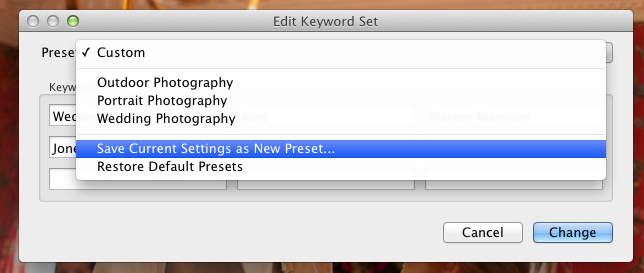
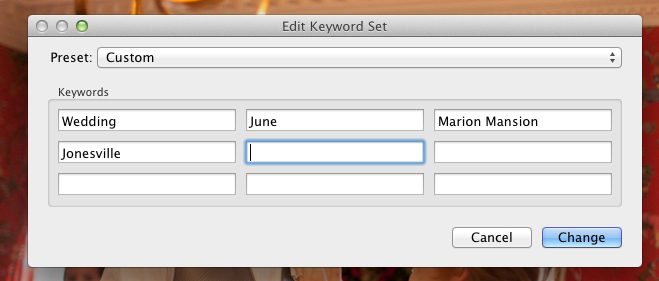
save_as_keyword_preset enter_keywords_for_set

Wrapping Up

Keywords are essential for building the data we attach to images, but take some time to apply. With keyword sets, we alleviate some of the pain and win our time back by keeping the common keywords at our fingertips.

Are you using keyword sets yet? Let me know how you’re applying your keywords.

Filed Under: Lightroom

Lights Out in Lightroom

January 19, 2019 by Andrew Leave a Comment

I’m always trying to eliminate distractions. Whether it’s putting my iPhone in airplane mode, unplugging my Internet, or escaping outside, I think eliminating distractions are so key in creative work. Luckily, Lightroom will even let us eliminate distractions within the program using Lights Out mode in Lightroom. Kind of like focus mode or dark mode on steroids.

Lights On

Standard “lights on” view in Lightroom.

Now I’m sure you’re familiar with what Lightroom’s interface typically looks like. Sure it’s great – but the issue at hand is that there is so much going on.

This tip will work for you in any module, and allows you to really hone in on your image. To enable Lights Out mode, go ahead and press “L” on the keyboard.

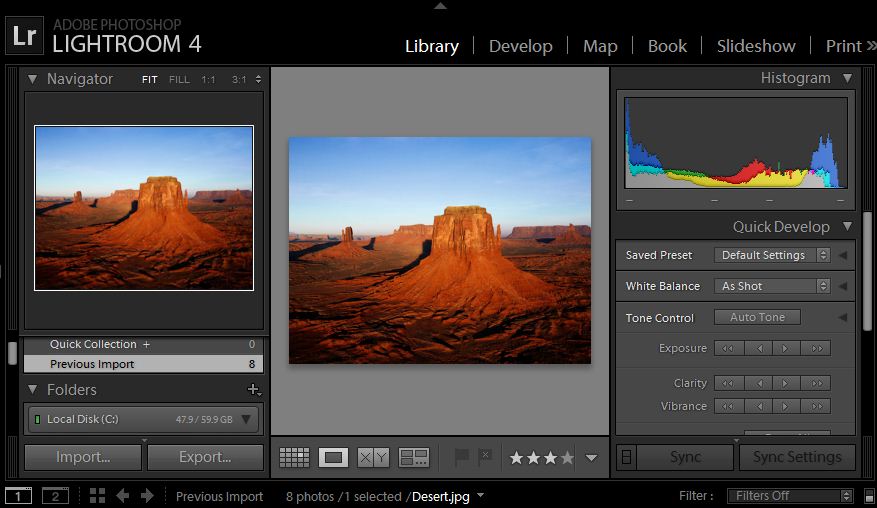
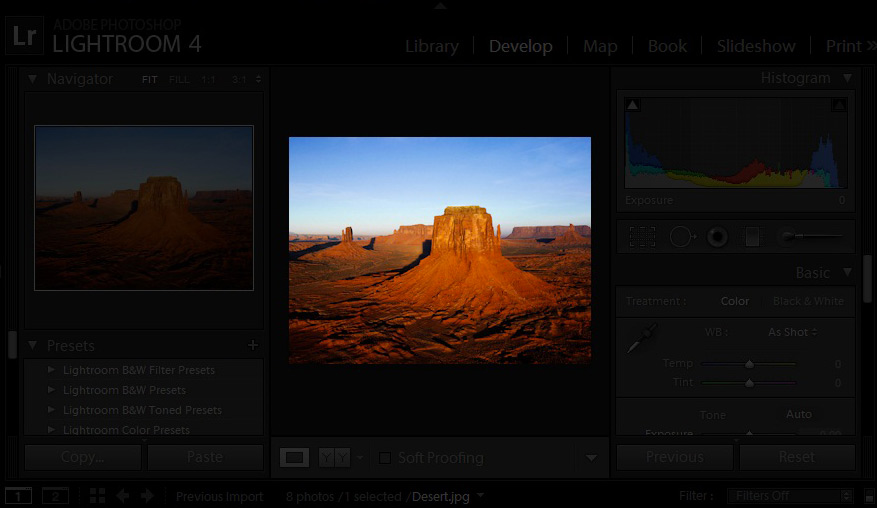
The lights are now dimmed, and the background is mostly out of view.

Press “L” one more time and here’s what happens:

The distractions are now completely out of view. All that we need to do is press “L” one more time to return to the default view, turning the lights back on.

Filed Under: Lightroom Tagged With: finished

Next Page »

Search

Latest Posts

  • Merging Catalogs in Lightroom
  • Troubleshooting Lightroom: 5 Quick Fixes
  • Quick Tip: How did I edit that photo?

All Pages

  • About
  • Contact
  • Get Help
  • Home
  • Lightroom Dictionary
  • Sign up For Updates

Copyright © 2023 · eleven40 Pro Theme on Genesis Framework · WordPress · Log in