Lightroom Love

  • Home
  • Presets
  • Get Help
  • Contact

What is a Lightroom Preset, and why are they so handy?

January 9, 2020 by Andrew Leave a Comment

Hi there Lightroom fans! On the first day of Preset Week, we’ll take a look at the power of Lightroom presets. Think of Lightroom presets like recipes, only much easier to follow! Presets let us save our editing styles, and apply them with one click.  Once we get the “look” of an image that we want, we can build a preset so that editing another image in the same way takes only one click. That should get you excited. 😀

Presets let us save our editing styles, and apply them with one click.

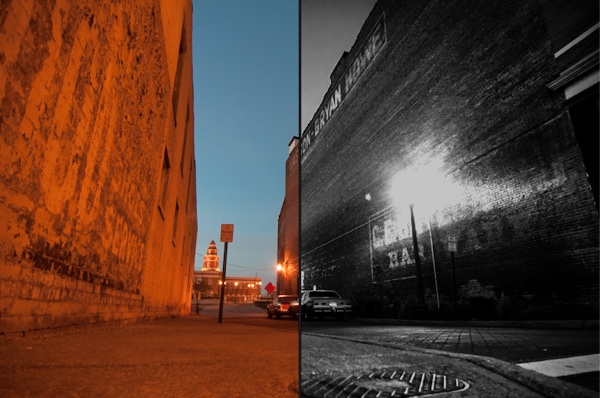
Presets play an important role in Lightroom. They’re handy for replicating our editing style. With just one click, we can apply the same style to our photos over and over. This means that we can edit consistently and quickly. Presets are going to automate the editing process and reduce a lot of work to just one click.

Lightroom comes with quite a few presets built in! You can apply them in the Develop module, and you’ll find the preset panel on the left side, just below the Navigator.

Presets get applied in the Develop module. They have their own panel on the left side of the Develop module just under the Navigator. To apply a preset, all you have to do is click the name of the preset. Boom, presto preseto! The image gets all of the preset settings applied to it instantly.

By default, Lightroom comes with some pretty good presets that you can play with. You can also download many presets for free across the internet, and several great paid preset packs are out there as well.

Getting excited about presets yet? If you didn’t know about them before now, you might be getting excited about the speed at which we can apply our editing styles with presets. Stay tuned for the rest of Preset Week as we take a look at how to build your own presets and much more.

Any questions? How are you today?

Filed Under: Presets Tagged With: finished

How to Import Lightroom Presets

December 30, 2019 by Andrew Leave a Comment

Lightroom presets are awesome. Here’s how to use presets. With just one click, we can apply editing styles to our photos in Lightroom. What’s even better is that we can download and trade presets! However, we have to import them to get Lightroom to recognize the added presets. Today, I’ll be showing you how.

First thing is first. You have to have some presets that you’re wanting to load into Lightroom. Lightroom presets have a file extension of .lrtemplate . You might download presets that are compressed or zipped – .zip files – but the files that we need to feed to Lightroom are .lrtemplate files. Zip files need to be extracted or decompressed, and you can do this easily in your OS. (Here is Windows help; on Mac, just double click to extract a zip)

Okay, so now we have our preset ready to import. Go ahead and note what folder that preset is in because we’ll need to browse to it in just a moment.

Now in Lightroom, in the Develop module, make sure that on the left panel, you can see the presets already in Lightroom. Place your mouse cursor in the preset area, then right click to bring up a menu. Go ahead and choose “Import”.

Okay, so now we will show Lightroom where our presets are. I’m on a Mac, but this is basically the same on the Windows platform. All you have to do is browse to the folder where .lrtemplate files are stored, and then click to import them. We can also shift click two presets to select a long list of presets, or control click to select multiple presets. Here, I’m using the VSCO Film Presets, which I highly recommend purchasing.

That’s all! Your presets will appear in that panel on the left and you’re free to apply them to your heart’s content.

Filed Under: Presets Tagged With: finished

How to Build a Warm Black & White Look

December 16, 2018 by Andrew Leave a Comment

If I could shoot black and white photograph for a living, I would. But as you might have noticed, I also love warmth in photos. 😀 Today, Ill show you how to combine the best of both worlds as we build

I want to walk you through creating a warm black and white preset. As you might be thinking, this is a black and white look that is pushed just alittle bit to the warm side of things. It’s not quite a sepia look, but has more warmth than the typical black and white treatment.

Black White and Warm All Over

At left is a standard black and white treatment, with the right half showcasing a warm tint.

The first step will be to convert your photo to a black and white look. There’s a couple of ways you can do this from the Develop module. There’s some presets that come with Lightroom that are pretty good for getting you to black and white, and the best part is they are applied with just one click. You can also go the long way around and use the Black and White option to switch to a black and white mix that you can customize.

Black and White Treatment Option

Next up, we’re going to drop down to the Split Toning panel. We’re still working in the Develop module and you’ll find it as you scroll down the right side. Let’s walk through the settings below that we’ll be using.

Below are the tweaks that I used to warm the black and white look. This panel consists of two main parts: highlights, and shadows. Each controls the amount of color added in those regions.

The first thing that we do is pick the hue. We’re looking warm, so I take each of the hue sliders and drag them into the orange region. We are basically adding orange to the photos, although in very small amounts. After getting both of the hue sliders setup, you won’t see a change. We still need to add saturation which controls the amount of color added. I took both of the saturation sliders and moved them slightly to the right to add some color.

Split Toning Warm

Wrapping Up

Using that split toning panel can warm up a black and white look with one quick slider adjustment. Do you like the look of a warm black and white photo? Check in with a comment to let me know what you think.

Filed Under: Presets Tagged With: finished

Happy Preset Week!

December 8, 2018 by Andrew Leave a Comment

A couple of weeks ago, we had a special series of posts that I called “Adjustment Week.” The positive feedback on this series was overwhelming, and I enjoyed writing it more than any other posts. I felt like that series gave us a chance to take a deeper look at one part of Lightroom.

Well, I’m back, and I’ve got another great series. We’re talking Lightroom presets, and I’ve got six posts that will teach you everything there is to know about how to handle Lightroom presets with great power.

If you don’t already know, presets are one click solutions for applying edit styles to your images. You can build them and also download them for free from tons of places all over the web. Plenty of photographers are sharing their presets and that should excite you.

Also, this series of posts will feature a surprise announcement that I’m excited to let you in on. More on that later.

Comments are open – ready to learn presets people?

Filed Under: Presets

Blue Sky Dream Preset

December 7, 2018 by Andrew 2 Comments

Blue skies are a state of mind. Use this preset for the bluest skies you’ll see, plus a little enhancement to the rest of the photo.

Download

Not sure how to install? Check this article out: How to install presets.

Filed Under: Presets Tagged With: finished

Rose Colored Glasses Preset

April 21, 2018 by Andrew Leave a Comment

“I guess I kind of lived in a fairytale world… looking at everything through rose-colored glasses. I probably always will, to a certain extent. – Sharon Tate”

Download

Rose Colored Glasses Preset

Not sure how to install? Check this article out: How to install presets.

Filed Under: Presets Tagged With: finished

Carnival Glow Preset

July 3, 2015 by Andrew 1 Comment

I love carnivals. When I think of the way that I feel when I’m at a carnival, one word comes to mind: lights! Lights, everywhere. The glow seems to follow you on every ride, to every booth. I mixed this preset up to really give the feeling of that glow in my photos. Enjoy!

Find more free lightroom presets here.

Carnival Glow Preset

Filed Under: Presets Tagged With: finished

Film Fanatic Preset

July 24, 2013 by Andrew 1 Comment

Going through a box of old family photos from the film era was the inspiration for this. I spent a long time studying them, thinking of what makes film the way it was. The result was a mix of grain, tone curves, color shifts, and much more. Enjoy this free Lightroom film preset.


Filed Under: Presets

Anselle Landscape Preset

July 13, 2013 by Andrew 2 Comments

This preset will bring a landscape to life, even without color. It pushes your blues to really be contrasty and dark and brings clarity and contrast to the rest of the photo. Enjoy. You can find more free lightroom presets here.


Filed Under: Presets

Dream Scene Preset

June 23, 2013 by Andrew 1 Comment

I often wish I could make photographs of the things that I dream about. I can’t, so this preset is the next best thing that makes me feel like a photo is from a dream. Enjoy.

Dreamset Preset


Filed Under: Presets Tagged With: finished

Next Page »

Search

Latest Posts

  • Merging Catalogs in Lightroom
  • Troubleshooting Lightroom: 5 Quick Fixes
  • Quick Tip: How did I edit that photo?

All Pages

  • About
  • Contact
  • Get Help
  • Home
  • Lightroom Dictionary
  • Sign up For Updates

Copyright © 2023 · eleven40 Pro Theme on Genesis Framework · WordPress · Log in