Lightroom Love

  • Home
  • Presets
  • Get Help
  • Contact

Getting Grainy with Lightroom

November 16, 2018 by Andrew Leave a Comment

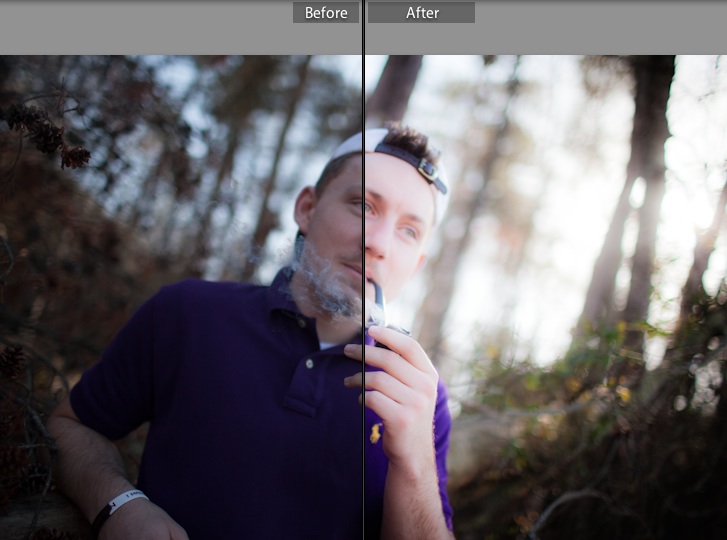
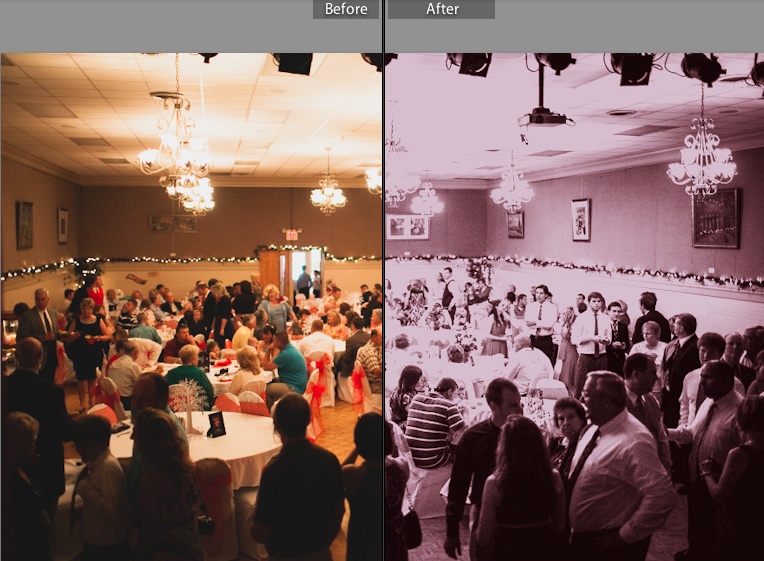
As the old saying goes, everything old is new again. In the world of photography, I’m all for this trend. The days of “the film look” are coming back in full force as photographers are making their digital images take on the look of film.

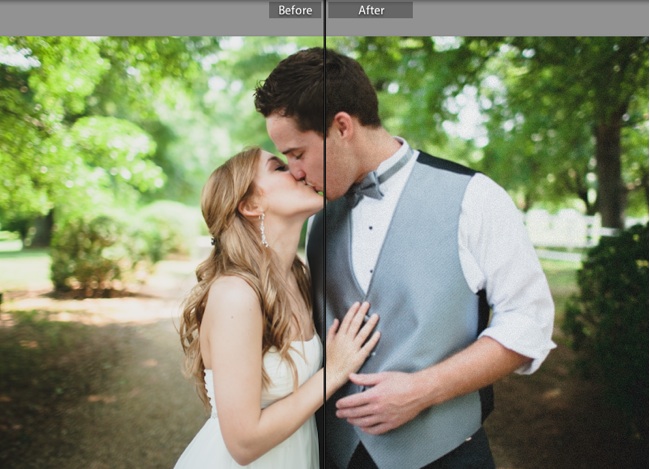
Before and after I added some subtle grain to my beautiful friends and wedding clients.

One of the best ways to do this is with grain. You see, film is organic. Film has a bit of roughness about it that gives it some personality. I’m all for the high ISO power of my modern digital cameras, but many photographers feel that we’ve lossed some of the grittiness that has made photography so powerful.

Enter the grain slider. You’ll find it in the Develop module, in the effects pane. With it, we can add back just a little bit of the film magic lost in the digital era. On the grain slider, there are three factors that we can change to add the grain: amount, size, and roughness.
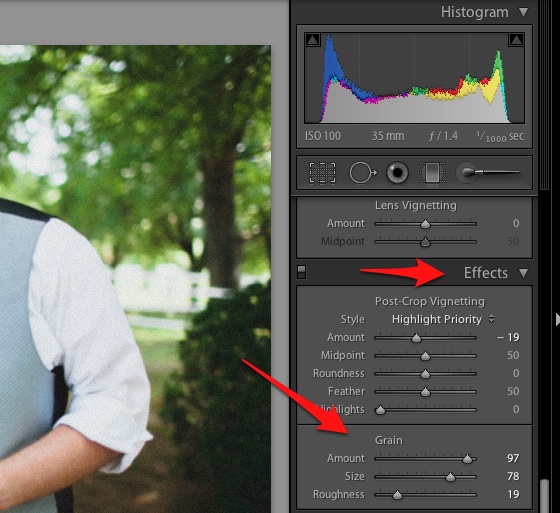
You’ll find the grain option in the Develop module in the “effects” pane on the right side of Lightroom 4.

This is one of the many parts of Lightroom that you just have to play with to get a solid feel for. There are certain “visual effects” that are hard to describe. Here are the three factors that we can tweak with the grain option:

  1. Amount – this is pretty straightforward – how much grain do you want to add to your photo?
  2. Size – how big are the “pieces” of grain you’re looking to add? Grain can be very fine and small, or can be rather large in nature. One thing I have noticed is that
  3. Roughness – this is the part that I probably can explain the best; in the film days, most films had some degree of grain, but each had its own personality. High ISO films like ISO 1600 had “rougher grain” than the ISO 400 counterpart. Pushing this slider toward the 100 end is a closer simulation of the rough grain of high ISO films.

One huge tip here: work at 100% zoom for most of these tweaks. If you don’t, you risk really overdoing it with the effect. Although I love adding a little grain to my photos, I would definitely caution you to work slowly with this effect. It’s fun to dive in and add more and more with the grain slider, but make sure and do it all in moderation.

Ever tried grain? What do you think of the results? Make sure and let me know what you think in the comments.
Filed Under: Lightroom Tagged With: finished

Should I outsource my editing?

April 21, 2018 by Andrew Leave a Comment

Hey again Lightroom Lovers! One thing that a lot of users have written into me about is the idea of outsourcing their image editing. This means taking your images and sending them to someone else to handle the edtiing process. It’s becoming increasingly

Because this is a Lightroom blog, I’m going to encourage you to learn Lightroom and handle your editing in-house. The less that you depend on other people for your success, the greater freedom that you have. Handling your own editing also ensures that you’re going to get it done the way that you want it (assuming that you know how to accomplish it).

But let’s face it. Not everyone has time to learn Lightroom from front to back. If you”re busy building your photography business, and it’s taking you 8 hours to edit a portrait session (or if it feels that way :D) it might be time to explore outsourcing.

Got 1100 photos to edit and no time to do it? It might be time to think about outsourcing.

You see, it’s all about how we can best use our talents. If we’re bad at editing and our time is best spent promoting the business and keeping more clients booking shoots, isn’t it best to focus on that and turn over the editing? Again, I think learning Lightroom is a fantastic idea, but we don’t all live in an ideal situation.

If you decide to outsource, who should you choose? There’s a number of great options out there that accommodate photographer’s needs based on turnaround time, image load, etc. For the last couple of years, I’ve been slowly doing outsourced editing for a handful of photographers, so I can share my views on this.

The best part is that I can return either finished JPEG’s, or a completed LIghtroom catalog for photographers to handle the exports. All of my edits are completed in 72 hours, and I promise satisfaction. For big things like weddings, I have photographers send a hard drive to me, but we also can do digital transfer. I have a lot of clients who reclaimed their lives and grew their photography business by  turning over their editing to me.

Have you tried outsourcing your editing? Why and who did you choose? Tell me more about your thoughts in the comments below.

Filed Under: Image Editing Tagged With: finished

Rose Colored Glasses Preset

April 21, 2018 by Andrew Leave a Comment

“I guess I kind of lived in a fairytale world… looking at everything through rose-colored glasses. I probably always will, to a certain extent. – Sharon Tate”

Download

Rose Colored Glasses Preset

Not sure how to install? Check this article out: How to install presets.

Filed Under: Presets Tagged With: finished

Daydreaming: The Future of Lightroom 5

December 16, 2015 by Andrew Leave a Comment

Lightroom has come so far from its early days. Each version has so much to add, and truly makes every upgrade worth the price. What’s the future for Lightroom? It’s hard to imagine, just because Lightroom 4 was so good, but here are four ideas I kick around on a daily basis.

True iPad Integration

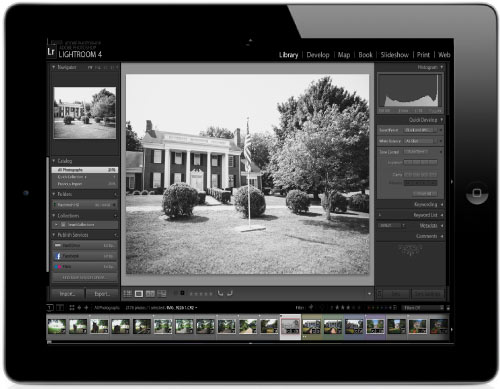
Lightroom on iPad

Like this… only not so stretched. 🙂

There’s nothing I want more than the ability to work in Lightroom from my iPad on the go. How great would it be to kill time while on car rides culling your photos? Adobe has hinted that some type of integration is coming, but we’re yet to see it. Imagine how good our images would look on that new Retina screen, too. It doesn’t have to be a full edition of Lightroom – just enough to get work done away from the computer.

Let’s Get Spotty

One of the areas that Lightroom has grown the most in the last couple of editions is the ways that we can apply retouching options in small areas. These spot retouching options are one way

I would love to see Adobe bring the paintbrush over from Lightroom, and really beef up the ability fix things on a pixel level basis. This is really the only reason I still use Photoshop, and I want to completely break away from having to boot up Photoshop.

Network Support

Lightroom still doesn’t support opening catalogs on network drives. I’m not sure why.

Faster, Please

Adobe, I love you and most of your products. But I have to admit: you’re getting bad about bloat. Lightroom is probably the least bloated app, but I do think that LR4 is slower than LR3. I don’t have any data to show that, but it feels that way to me. Make sure you make Lightroom snappier and quicker than ever.

How about you?

What do you want to see in Lightroom 5? The comments are open for this – keep it friendly toward the fine people at Adobe. 😀

Filed Under: Lightroom Tagged With: finished

Carnival Glow Preset

July 3, 2015 by Andrew 1 Comment

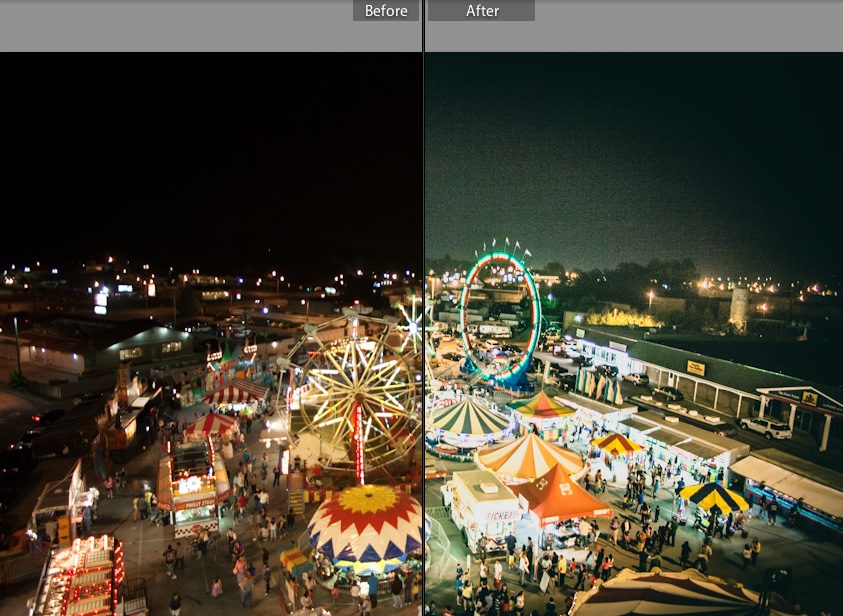
I love carnivals. When I think of the way that I feel when I’m at a carnival, one word comes to mind: lights! Lights, everywhere. The glow seems to follow you on every ride, to every booth. I mixed this preset up to really give the feeling of that glow in my photos. Enjoy!

Find more free lightroom presets here.

Carnival Glow Preset

Filed Under: Presets Tagged With: finished

Dream Scene Preset

June 23, 2013 by Andrew 1 Comment

I often wish I could make photographs of the things that I dream about. I can’t, so this preset is the next best thing that makes me feel like a photo is from a dream. Enjoy.

Dreamset Preset


Filed Under: Presets Tagged With: finished

Setting Up Lightroom for Best Performance

June 17, 2013 by Andrew Leave a Comment

As we dive into our year of learning Lightroom, we’ll get started today with the most important part: installing and setting up Lightroom! Think of this as a quickstart guide, although I’ll also be sharing some “ideal” setup information that you may not be ready to use.

Today, I want to share an email I recently got from a photographer I work with

 I’ve been working on perfecting my workflow and designing how I want everything setup.  Everytime I start to make progress, I run out of space on my hard drive, or can’t figure out how to split it up. Should I add an external drive? An internal drive! Help!

For me, I think a “media” drive is a great idea. I like keeping my OS on one drive, and everything else on another data.That keeps data separate, easier to manage, and safer in my opinion.

If you can make it possible, I think two drives is the way to go. As best you can, keep a drive with your OS and applications, and a separate drive just for your files like photos and Lightroom catalogs. The nice thing is that you can easily add a second drive externally, with a simple USB cable.

Choosing an external drive can be a little tricky because there are so many choices. Typically, the big decision is if you want to go USB or Firewire. These are two ports that are likely on your computer. Personally, I encourage people to stick with USB just because you’re guaranteed to have the port on your computer.

I use a MacBook Pro laptop, and my data setup is pretty simple: on the internal drive, I keep the Mac OS and Lightroom and all other applications. At my house, I store all of my shoots, Lightroom catalogs, and anything long-term on the external drive.

If you’re using a desktop computer, you can go one of two ways: install another drive inside the computer, or add an external drive.  If you’re using a laptop, the easiest way to go about it is definitely adding on an external drive. In either case, taking an external drive out of the box and plugging it in is far easier than an internal installation. If you’re tech savvy, you can save some money by buying an internal drive, but it’s not always recommended.

When it comes to external storage, you have to keep a few things in mind. Honestly, it requires being a little more careful than internal drives. It’s easy to trip over a cord and knock the external drive off of a desk. They’re also easier to forget at home and require something extra to carry. Still, I believe that keeping your photos and Lightroom catalogs on a drive separate from your everyday working files is a great idea.

How do you setup your data storage? Everyone seems to like something different – check in with a comment to let me know what you think.

Filed Under: Workflow Tagged With: finished

Should I shoot RAW or JPEG?

April 16, 2013 by Andrew Leave a Comment

Oh boy, this debate is a doozy. If you want the photography world’s version of the Hatfields vs McCoy battle, just pit a photographer who shoots JPEG against a photographer who shoots RAW.

If you aren’t familiar, the two formats are what cameras most commonly output image files in. You may have heard that some photographers swear by RAW, while others cling firmly to shooting only JPEG images. We’re not talking about the images we give clients – those will almost certainly be JPEG – no, instead we are talking about what format the camera records the photo in.

The Advantages

With all of the fuss about RAW, you’re probably wondering about what it actually provides versus JPEG images. Let’s take a look at some of the advantages.

White Balance

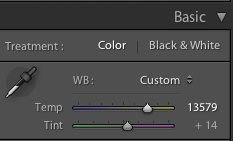
Have you ever gotten an image out of camera that was really orange or really blue? Sometimes the white balance setting on our camera goes crazy enough to throw the coloring of the photo off. We can adjust white balance in Lightroom, but the big advantage is that adjusting white balance in RAW images causes no loss in quality.

Shooting in RAW allows just to adjust the white balance with no quality loss.

Exposure Adjustments

RAW files simply have more data in them, so it should come as no surprises that we can “pull out” more information. Having to tweak the exposure is going to put a strain on your files – you’ll see noise added or the quality decrease in general. In RAW, the loss of quality is less significant.

Basically…

In general, RAW is going to provide more quality and more data to work with.

The Disadvantages

There’s only two main issues with handling RAW images: file size and the need to process.

The first issue is pretty self explanatory. RAW images have more data stored in them, so they are going to be larger files. Your cards will fill quicker and you’ll find yourself fitting less images on a memory card in RAW.

When it comes to the need to process, you’re not going to be able to immediately share your RAW files to Facebook or Twitter, or even upload them to most photo printing sites. This need to process can be a big time commitment. Copying images, opening them in some software, and saving them will be a necessity.

Most cameras provide a “best of both worlds” option by allowing you to shoot duplicate copies of RAW and JPEG images. This would of course fill your memory card even quicker, but does give you quick JPEG copies to work with if need be.

Advice

I have to say that I fall firmly into the RAW camp. I feel that it allows me the most data to work with, and I’m willing to sacrifice the trade-offs of file size and a need to process.

For me, RAW is a necessity. I need to pull more data from my photos, adjust exposure, tweak white balance, and much more. I want every bit of data that I can possibly get, so RAW is a no brainer choice for me.

However, that’s not to say that there aren’t great uses for JPEG images. Sports photographers come to mind. I have several friends that shoot professional sports, and their line of work demands shooting in JPEG. For them, the advantages outweigh the benefits of the RAW format.

You’ll find my hard drive packed with Canon RAW files like these.

Sports photographers might shoot a half of a sporting event, then head to a designated media area. From there, they need to dump their images and transfer them over the Internet. This type of arrangement simply doesn’t allow for time to edit and apply retouching.

Here comes the issue that really throws people off. Yes, out of camera, JPEG looks better than RAW. This is because the camera’s “JPEG processing” basically applies editing within the camera. There is some sharpening, color adjustment, etc. RAW is going to give you a completely unprocessed images.

Yes, out of camera, JPEG looks better than RAW. This is because the camera’s “JPEG processing” basically applies editing within the camera.

Maybe the best way of looking at it is that shooting RAW is like shooting digital film. We really don’t get a finished product out of the camera when we shoot RAW, so it’s unfair to expect it to look better than a JPEG image. However, the post processing stage (hello, Lightroom!) is where we can make RAW show its full potential.

If you never venture into shooting RAW, you’re going to miss out on the power of the format. Unfortunately, too many people write off JPEG as being “good enough” and won’t learn the intricacies of processing RAW.

Wrapping Up

Regardless of the way that you choose to shoot, Lightroom accommodates and edits either file format. I put together every guide and walkthrough using my own images, and that means using RAW images. However, almost all of the guides and tips on Lightroom Love are universally applicable – although perhaps at the cost of some quality.

Lots of software can handle RAW images – Lightroom is just fantastically compatible and stays updated to handle the latest camera compatibilities. Other choices such as Photoshop, which uses Adobe Camera RAW, Phase One, and Bibble Pro will also process RAW files. Many professionals will swear by one RAW process over another. To my eyes, I like Lightroom’s RAW processing engine enough to never venture outside of it.

At the risk of sounding like a beauty pageant entrant, I have to say that there should be “world peace” among JPEG and RAW shooters. There’s room for both. However, if you’re afraid of RAW, you’re missing out on good things. Shoot JPEG by necessity, not out of laziness.

Are you a RAW shooter or a JPEG fanatic? Let’s open the comments for some friendly discussion.

Filed Under: Photography Tagged With: finished

How many catalogs should I use in Lightroom?

March 15, 2013 by Andrew Leave a Comment

As we already know, Catalogs are the basis of all we do in Lightroom; it stores all of our data and editing information. A reader recently wrote in to me with a question about how best to manage her catalogs. Here’s what she asked:

How many catalogs do I need to use? Should I use catalogs for each of my shoots, or one catalog with all of my photos in it?? Help me Lightroom Love!

 -Sincerely, Caught up in Catalogs

No fear, distressed reader. The truth is that this is a dilemma that many Lightroom users – myself included – face. Unfortunately, I’m not sure that there’s an easy answer for the problem at hand. The best thing we can do here is to look at the two approaches, and let you decide how you want to use catalogs.

Lightroom catalog folder

Lightroom catalogs are at the core of the program – should we use one or tons?

One Catalog

Using one big catalog with all of your images is really powerful. See, Lightroom has tons of features built into it that help us sort, categorize, view, and edit. The fact that we could do this with thousands and thousands of images is where the power of Lightroom really starts to shine.

Once we’ve added keywords, labels, flags, stars and more, we can really see the power of Lightroom. No matter how many images we add in, I still find it easy to get to the photos I need in just a few seconds when you’ve spent time tagging your images.

Using one catalog certainly is advantageous in some senses. Everything is at your fingertips, and Lightroom really makes it easy to get to what you need.

Multiple Catalogs

Using multiple catalogs is a huge mental aid to me. I have a terrible (yet sometimes good) habit of jumping around between photo projects. I suffer from information overload – if I see other photos to work with, I’ll be tempted to get away from the task at hand. Implementing controls against this are really important in my workflow.

Using multiple catalogs is a good way to help me stay focused and work on one project at a time.

Data feels safer to me in multiple catalogs. Data segregation is a really important internal control in my workflow as well. If I had one accidentally get deleted (and my backup was toast) then that’s tough. But if everything I’ve ever done is in a single catalog, then I’m going to really suffer a loss. And although Adobe constantly improves catalog performance, I still think smaller catalogs are inclined to work more quickly than massive ones.

A Happy Marriage

There’s no rule that says that we have to exclusively choose one system to use. I probably lean more toward the “multiple catalogs” approach, but there are a few consolidated catalogs that are important to my workflow.

Let’s take the way I shoot weddings for example. I might have 1500 – 2000 images to work with from any given wedding. I don’t really believe in mixing them all in – that’s too much of a risk of accidentally deleting things or accidentally altering them. Therefore, I give each wedding its own catalog.

But there are times when I need to get through tons of images at once. Let’s say that I’m digging for all of my cake photos from weddings in 2010. If I have a master catalog with all weddings from 2010 and those photos tagged as “cake”, then this is a breeze. Singular, consolidated catalogs are important to me in my workflow too. There’s room for both in our workflow if we manage it carefully!

Wrapping Up

One catalog or many? You might walk away from this article not having any more of a plan than when you started. That’s okay. Designing, tweaking and perfecting your workflow is a long process that even I still seem to struggle with.

As I’ve said many times before and will say many times hereafter, all of our workflows are different. I don’t shoot the same as you, so we can’t use the same catalog process and expect similar results. It’s neither logical or realistic that the same plan can work for different photographers, shooting completely different events.

I love the idea of keeping a single big catalog for all of my own personal photographic adventures. (That’s something I’ms tarting here soon) But for the safety of my own data and to help me maintain focus, I love my multiple catalog approach.

How do you manage catalogs? Check in with a comment – I’m excited to hear what you think.

Filed Under: Lightroom, Workflow Tagged With: finished

How I Learned to Love Adobe Lightroom

March 15, 2013 by Andrew Leave a Comment

I have a confession everyone: I once hated Lightroom.

Actually, “avoided” is probably a much more appropriate term. It was installed on my hard drive for probably a full year before I started using it. It was just too complicated. At the same time, it also didn’t allow me to make the really precise adjustments that Photoshop was providing for me.

I had to face the facts. I was going to have to learn Lightroom. I was a busy wedding photographer with thousands of images to manage every weekend during wedding season, plus doing the editing for plenty of other photogs. I was slowing down in delivering images and that was hurting my business. Adobe Lightroom was the solution to this. With it, I cut my editing times to a fraction of the time and got everything back on track.

I had to face the facts. I was going to have to learn Lightroom.

Managing thousands of photos required me to learn to love Lightroom.

I’ve known so many users who have taken one look at Lightroom and ran away. Sure, the program has a lot of different parts. It’s a lot to learn at first. The key to learning to love Lightroom is to resist being overwhelmed. Learn the parts that you need to learn.

A lot of users and Lightroom users that I coach are missing the forest for the trees. The purpose of Lightroom is to solve your digital workflow issues. You don’t have to use every part of the entire program in order to tame your photo library.

Photos disorganized and out of whack? Master the library module. Need the absolute best editing tools? Venture into the Develop module. Want to put together web galleries for clients? Visit the web module.

Don’t let the selection of modules overwhelm you. Learn and utilize one at a time.

Another reason that people will avoid Lightroom is that they don’t feel like it can replace Photoshop. As we’ve learned, the Develop module plus its Adjustment panel is plenty powerful for most users.

You have to jump in and commit to using Lightroom, to building and managing a catalog and learning the ins and outs. The learning curve might be a bit steep at first, but it flattens out to just using Lightroom logic in no time. I wouldn’t advocate using it so strongly if I hadn’t seen so many users have their workflow transformed.

Are you a longtime Lightroom user? Was it love at first sight or did it take time? Make sure and let me know what’s holding you back if you’re not jumping in.

Filed Under: Lightroom Tagged With: finished

« Previous Page
Next Page »

Search

Latest Posts

  • Merging Catalogs in Lightroom
  • Troubleshooting Lightroom: 5 Quick Fixes
  • Quick Tip: How did I edit that photo?

All Pages

  • About
  • Contact
  • Get Help
  • Home
  • Lightroom Dictionary
  • Sign up For Updates

Copyright © 2023 · eleven40 Pro Theme on Genesis Framework · WordPress · Log in