Lightroom Love

  • Home
  • Presets
  • Get Help
  • Contact

Let’s Try Some Basic Adjustments

May 14, 2013 by Andrew Leave a Comment

Today we’ll be dealing with what are known as basic adjustments, but the increidble part is that these tools can handle maybe 90% of your image editing needs.

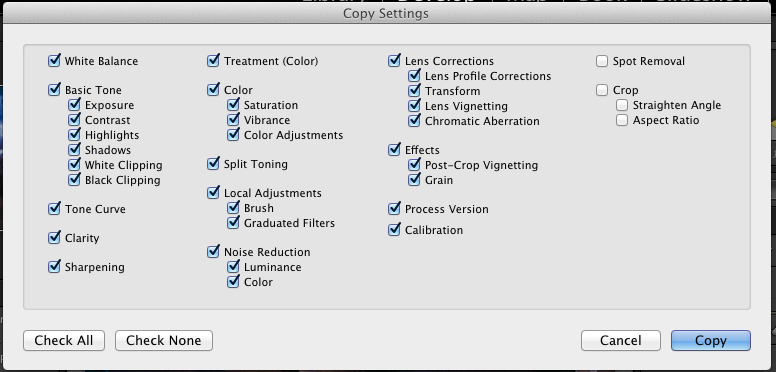
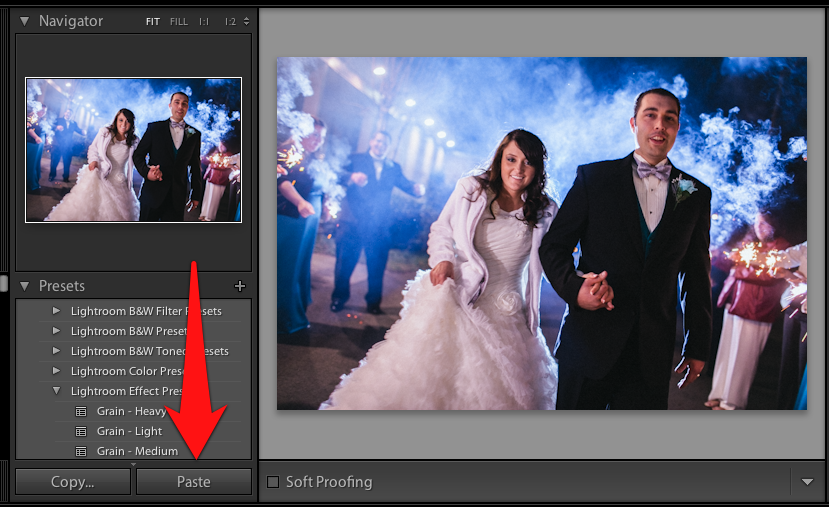
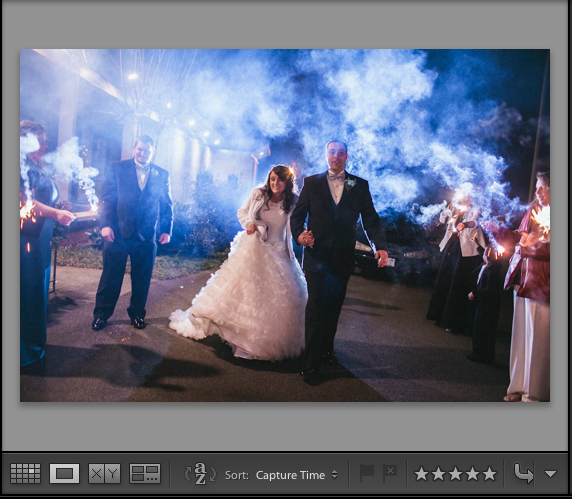
For each of these, it can be hard to explain with words the visual effect of the sliders, so I’ve included screenshots of the adjustments. Let’s get started!

White Balance / Tint
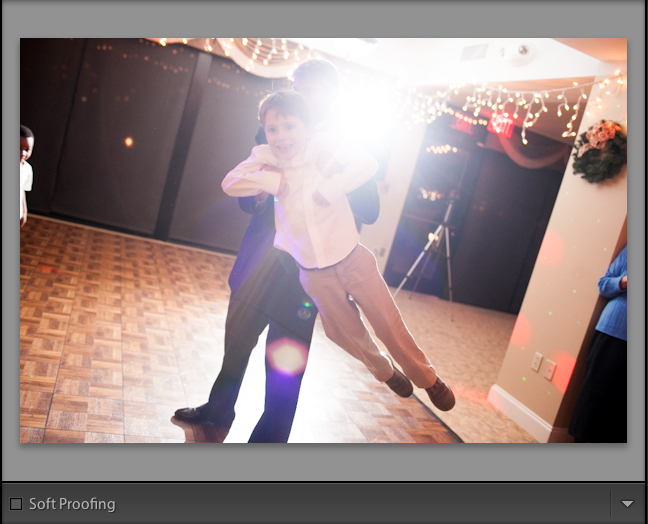
Exposure

The exposure slider ranges from number to number and is used to control lighting in images.

Grab and drag

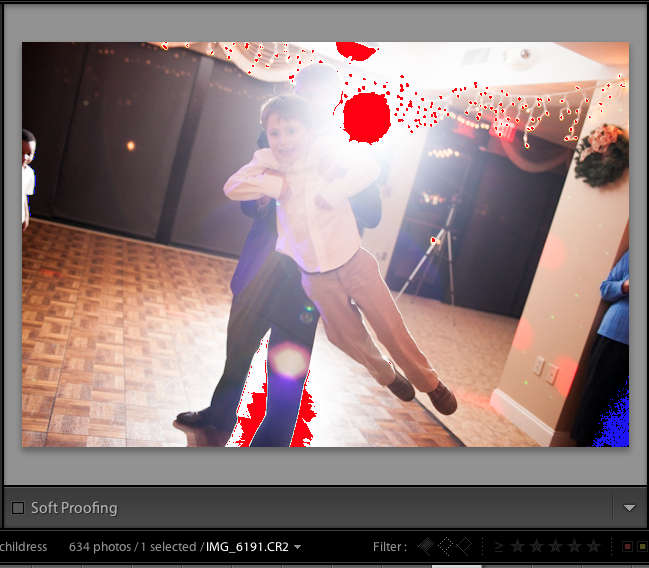
Images that are too bright

Contrast


Highlights, Shadows, Whites & Blacks

Four sliders that let us carefully tweak exposure are also available. These are the highlights, shadows, whites, and blacks sliders.
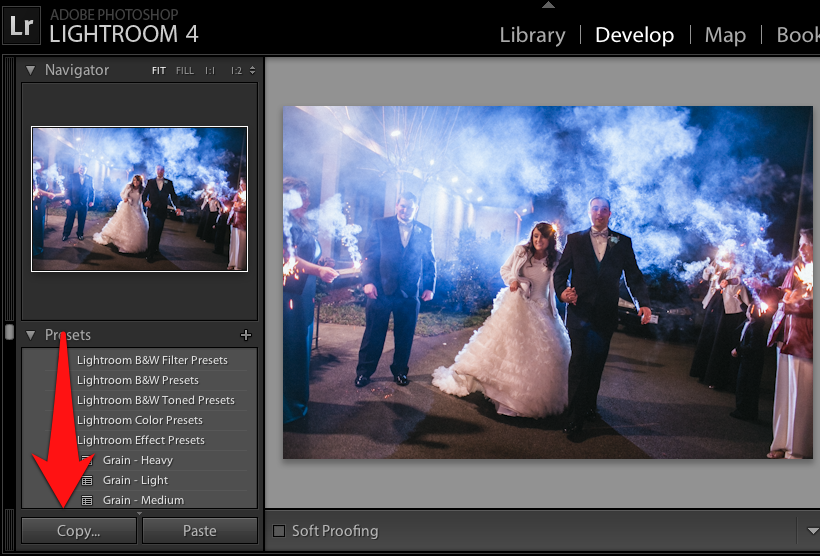
Clarity

Presence and clarity help us enhance the fine details of

Vibrance & Saturation

Vibrance and sliders are easy ways to control all of the colors of our photo. Vibrance works better than ever in Lightroom 5, and saturation is still a helpful tool.

The difference between vibrance and saturation is tough to put a finger on. I like to think of Vibrance as smart saturation. It deepens the color of the important colors of the photo, and it is thus smarter than standard saturation.

You can also dial back vibrance and saturation to give the photo a low-key look.

Saturation is a slider that describes ho

Take it easy with both sliders, or else your photos will begin to look a bit nuclear.

Wrapping Up

When most users start off with Lightroom, these types of adjustments are the first thing to come to mind. Getting started with adjusting your images in the Develop module can seem overwhelming, but the Basic adjustments we tried out today are pretty easy with some practice! Spend some time experimenting with them on your images, knowing that they can be undone easily.

Did you try out these adjustments or need more help? Leave a comment if you want to share.

Filed Under: Lightroom, Uncategorized

Change and Correct Image Capture Time in Lightroom

April 1, 2013 by Andrew Leave a Comment

I have to admit that when Daylight Savings Time changes our clocks twice a year, that one clock that I always forget to change is the clock on my camera. This inevitably throws off the time in all of my images and that has a way of creating issues.

Recently, I shot an engagement session and hired a second shooter to cover it from another angle. He had remembered to change his clock forward an hour, but I had not. All of his shots were at the beginning and all of mine were at the end of the shoot which grouped the images awkwardly.

In any case, I needed to change the time of all my images and push the time ahead one hour. Lightroom actually has a built in way of doing this that’s easier than I would’ve expected!

The first thing that I do is get all of the images selected with times that need correcting, and I do this with a Library filter. In this case, I filtered it to images shot with my camera, the E-M5:

Next, I went ahead and selected all of the images by pressing CMD+A (or Ctrl + A) on Windows. This selects all of our images.

image

Now, go to the Lightroom menu and choose Metadata and then choose Edit Capture Time.

image

We get a menu in Lightroom that allows us to correct the time of our images. In this case, I’ll need to push the images ahead by one hour. The second option on this menu, “Shift by set number of hours”, is perfect. I’ll choose it and input +1 hours. Lightroom calls this the time zone adjustment, and that’s a great reason to use this tool too.

Lightroom shows the originally recorded time, as well as the “corrected” version that will take effect after pressing “Change All.” After we press “Change All”, all of our images will have their time corrected.

Another option on this menu is to “Adjust to a Specified Date and Time.” If your camera’s time was way off and you need precise corrections, you can choose that option as well. After you correct the day and time for one image, it will update all of the other images as well, relative to the first image. That means that an image shot ten minutes later will have its time corrected to what you chose, plus ten minutes.

Edit Capture Time is a quick way to fix one of those pesky mistakes that we all make. If you’re unclear on how to use this tool, feel free to leave a comment and I’ll do my best to help you.editcapture2 editcapture3 editcapture1


Filed Under: Lightroom, Uncategorized

How to Sort Photos in Lightroom

March 29, 2013 by Andrew Leave a Comment

If your images aren’t already in the order you want them to be in Lightroom, sorting them is a breeze. Lightroom has the power to sort images in a number of different ways, so let’s take a look:

We can sort images in multiple modules, but I recommend that we do all of our sorting in the Library module because remember, it’s for managing our images and controlling how they’re stored. I like to think of the Develop module as being strictly for edits.

You’ll find the options to sort automatically in the Library module’s Grid View. Remember we can enter Grid View by pressing G on the keyboard.

I do all of my sorting in the Library module and you'll see it automatically when you're in Grid View.

I do all of my sorting in the Library module and you’ll see it automatically when you’re in Grid View. You can also press the A-Z symbol to reverse the sort “direction” back and forth.

We can choose how images are sorted by clicking on the text, which in this case is “Capture Time.” You can also switch between sorting and reverse sorting by pressing the A-Z icon.

If you’re working in another view or you don’t see the area above for Sorting, press the arrow on the far right to add it to what’s displayed:

Press the dropdown arrow on the far right to add sorting if you don't already see it.

Press the dropdown arrow on the far right to add sorting if you don’t already see it.

Here are some ways that images can be sorted:

Lightroom has a ton of ways to sort images. How do you sort yours?

Lightroom has a ton of ways to sort images. How do you sort yours?

I think that most photographers will keep their images sorted by capture time, also known as the order that the images were shot in. However, there are different ways of sorting that you can experiment with. These 12 options are enough to keep most photographers satisfied.

Keep in mind that the only way that this sorts images is within the Lightroom catalog itself. It makes no changes to how they’re shown in the folders they are stored in or anything like that.

How do you sort your images? Feel free to leave a comment to let me know how you handle yours.

Filed Under: Lightroom, Uncategorized

Meet Lightroom’s Develop Module

March 17, 2013 by Andrew Leave a Comment

You’ve spoken, and I’ve listened: it’s time to move on and tackle perhaps the biggest part of Lightroom: the Develop module. I’ve had a number of readers email me about what we’ve been learning in Lightroom in the Library module, and they say they’re ready to get down to the editing work.

Today, we’re hitting a big turning point in our Lightroom education. We’ve spent a lot of time in the Library module, learning how to cull, tag, and manage huge libraries of images. But today marks the intro to the Develop module.

The Develop module is where we have the power to work on our images and polish them to look perfect. Here’s a few things we’ll be covering as we start working through it:

  • Correcting exposure and improving lighting
  • Converting images to beautiful black and whites
  • Reducing noise in our images
  • Sharpening images to perfection to bring out the finest details
  • Controlling color in images precisely

What do you know about the Develop module so far? Feel free to leave a comment if there’s anything you want me to teach as we start working through every part of the Develop module.

Filed Under: Lightroom, Uncategorized

Keeping an Eye on Blown Highlights

March 17, 2013 by Andrew Leave a Comment

Hey again Lightroom fans! We’re looking at keeping an eye on blown highlights today with a quick and easy keyboard shortcut.

What is a blown highlight? In our photos, any area that is too bright to have any image data in it is a blown highlight. Basically, it’s so bright that it’s pure white and there’s nothing there. We overexposed those areas, and thus they are bright.

In this photo, you'll see that because of the flash in the background, there's some really bright areas of the photo. What if we want to edit it so that we have no "blown out" highlights?

In this photo, you’ll see that because of the flash in the background, there’s some really bright areas of the photo. What if we want to edit it so that we have no “blown out” highlights?

If we don’t shoot the image correctly to begin with, we’ll hit blown highlights that are really difficult to recover. However, we also might accidentally make our images too bright in the editing process and we have to be careful of that as well. We can use a quick keyboard shortcut to watch for that.

To turn on the visual for blown highlights, just press jon your keyboard, In this photo, this is what you’ll see:

After turning on the clipping visualization, the areas in red are blown out.

After turning on the clipping visualization, the areas in red are blown out.

Lightroom adds red coloring to the blown out areas to help us see where the photo is overexposed. Keep in mind though that it’s not always a bad thing to have overexposure if that’s the effect you’re going for. As we bring the exposure and highlights back down, the areas will disappear.

I think that this overlay is best applied when you’re working with portraits and don’t want to blow out skin, or even landscapes where you want to make sure you have detail in the sky. With that one keyboard shortcut, you can keep a close eye on the highlights.

Are you using this trick or do you plan to start now? Leave a comment if you’ve got something to add.

Filed Under: Lightroom, Uncategorized

Copying & Pasting Develop Module Settings

March 17, 2013 by Andrew Leave a Comment

Hey again! Today, I’ve got a great tutorial on copying and pasting develop module edit settings. When we copy and paste our editing settings, we can take our exact edit from one image and transplant it on to another. This can help us speed up our editing process and make sure two images match. Let’s take a look at how easily and quickly we can do it.

This can be performed in the Develop module, and all it takes is two photos. We will start with one photo that’s already been edited, so go ahead and pick it out from the filmstrip.

Once we have our image selected and up, just press the Copy button on the left side of the Develop module.

To copy and paste our editing settings, start by selecting a photo in the Develop module and press the "Copy" button on the lower left side of Lightroom.

To copy and paste our editing settings, start by selecting a photo in the Develop module and press the “Copy” button on the lower left side of Lightroom.

Once we press copy, we’ll be presented with a list of settings. Let’s check it out:

When the copy settings dialog pops up, you have a list of settings. Whatever settings you leave checked are the ones that will be copied from our edited image. You can selectively choose which settings will be copied, or press "Check All" to copy them all.

When the copy settings dialog pops up, you have a list of settings. Whatever settings you leave checked are the ones that will be copied from our edited image. You can selectively choose which settings will be copied, or press “Check All” to copy them all.

On the copy settings menu, we can select which settings we want to copy from our edit. You can be as selective as you wish and only copy settings like “Clarity” or “Treatment (Color)” to apply to our other image. In this way, you can be really selective in what part of the image’s edit you want to move to another image.

Next, go ahead and select the image you want to paste the settings onto. Simply press paste, and voila!

Pressing "Paste" will place all of our editing settings onto another image. You can see that because I copied almost all of the settings from the first photo, this photo looks very similar after applying the paste.

Pressing “Paste” will place all of our editing settings onto another image. You can see that because I copied almost all of the settings from the first photo, this photo looks very similar after applying the paste.

After the paste, you can see that our images are looking very similar! When we use this option, it’s usually best applied to similar images; otherwise copying and pasting the settings isn’t going to be very effective and may leave us with some funky edits.

Copying and pasting settings is one way to edit photos quickly. Are you using this or do you need more help with it? Leave a comment if you need help or have something to add!

Filed Under: Lightroom, Uncategorized

Quick Tip: Toggling Information Overlays

March 16, 2013 by Andrew Leave a Comment

It’s quick tip time again! Today, I want to share a super simple option to see more information on your photos. We can toggle information overlays over our photo to see the day and time the photo was shot, and also see the settings used on our camera.

I typically will use this when I’m working in the Develop module to check my settings. It’s part of the way that I try to make mental  notes on improving my settings in future shoots.

By default, this is likely what your photo workspace looks like in the Develop module:

noinfo

By default, my workspace had no information. If we press “i” (that’s the letter “i”) on the keyboard, we add information on top of the photo:

info1

Pressing it once adds the date and time information the photo, as well as the file name. Pressing it again shows the camera’s data on the settings we used on top of the image.

info2

If you want to remove all overlay info, just press “i” again. Basically, just press i to cycle information on top of the image.

Will you use this tip? Feel free to leave a comment to let me know.

Filed Under: Lightroom, Uncategorized

Welcome to Adjustment Week!

March 15, 2013 by Andrew Leave a Comment

Welcome to a series of posts that I’m calling “Adjustment Week”. As part of our dive into Lightroom’s spot adjustments, I’ve put together a set of tutorials that will teach you how to use Lightroom’s spot adjustments!

When we refer to “adjustments”, we’re talking about the local adjustments. This means the tweaks that only impact a part of the image, as opposed to the whole image adjustments that are made with the Develop module sliders.

Whenever I try to persuade Photoshop purists to give Lightroom a closer look, I seem to hit the same complaints; they don’t feel that Lightroom has the local adjustments that makes Photoshop so powerful. There’s some truth to this, but there’s also a lot of power to be found in the Adjustments panel of the Develop module.

[image here]

Class Schedule

I’ve got a set of posts lined up to cover all of the spot adjustments:

  • Spot Fixes with the Clone & Heal Tools
  • Mastering Graduated Filters
  • Red Eye Fixes Made Simple in Lightroom
  • The Complete Guide to Lightroom’s Adjustment Brush

Dive in headfirst. Each post in this series is going to help you move closer to handling your images completely in Lightroom. This is one of the big barriers to relying on Photoshop. I still love Photoshop for its in-depth power, but you might be surprised by all of the features that Lightroom offers.

Is there anything else you want to see as a part of our Adjustment studies? Are you excited to learn more about how these work? Leave a comment to let me know.

Filed Under: Lightroom, Uncategorized

Search

Latest Posts

  • Merging Catalogs in Lightroom
  • Troubleshooting Lightroom: 5 Quick Fixes
  • Quick Tip: How did I edit that photo?

All Pages

  • About
  • Contact
  • Get Help
  • Home
  • Lightroom Dictionary
  • Sign up For Updates

Copyright © 2023 · eleven40 Pro Theme on Genesis Framework · WordPress · Log in